Olympus FV1200 - Z Drift Compensation
The Olympus FV1200 Z Drift Compensation (ZDC) module is an auto focus tool that corrects for changes in the distance between the objective lens and the specimen to compensate for focus drift during long time-lapses. It is available in two operating modes, Single Shot (aka. Focus Search) mode or Continuous Focus mode. Only Single Shot Mode is compatible with Z series.
ZDC in Single Shot Mode
In Single Shot (aka. Focus Search) Mode the ZDC activates briefly before image acquisition.
- Start the microscope as usual but make sure the confocal software is closed
- Focus on your specimen down the eyepieces
Enter the System Setting screen by pressing the spanner icon on the I3-TPC touch pad controller
- Press the Customized tab on the System Setting screen
- Make sure the Focus Limit Setting box is ticked and press the Detailed Setting button
- Look down the eyepiece and focus slightly above your sample; beyond where you want any Z series to end
- Press the 'All the same values SET' button to set the focus limit for all objective lenses
- Press the OK button and then press the X button in the top right to close the System Setting dialogue box
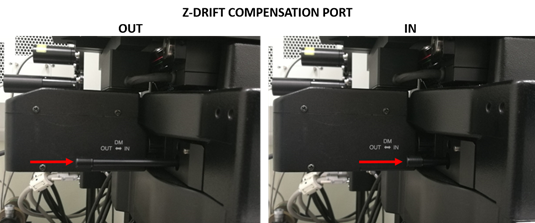
- Push the ZDC dichroic mirror (DM) lever on the left of the stage into place (see image below)
- Open the confocal software and adjust the laser, detector and scan parameters until they are suitable for your specimen
- Press the ZDC Setting button in the Acquisition Setting control panel
- In the ZDC Control window, make sure the Search Zone is set to 100 µm and the 'ZDC control executes immediately before scanning start' button is ticked
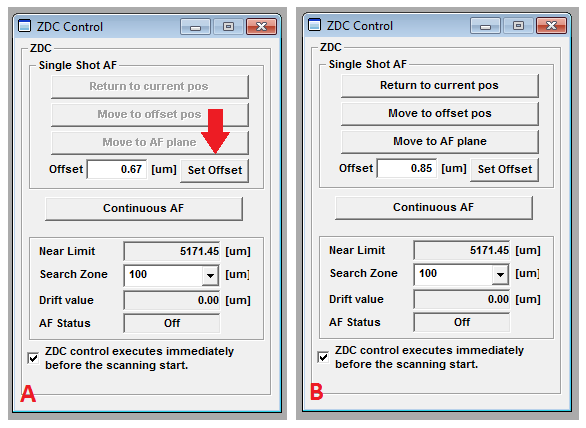
- Scan a reference plane in your specimen and press the Set Offset button in the ZDC Control panel (red arrow in image A below). The ZDC will search for the auto focus (AF) plane and will beep once when it finds it. The Offset is the distance from the AF plane to your reference plane
- The Single Shot AF buttons are activated once the the Offset has been found (image B). These allow you to move between your current plane, the offset position (which is your reference plane) and the AF plane, which is the reflective surface of the specimen vessel
- For Z series, set up Start and End positions and StepSize
- For TimeScan time series, set up the Interval and number of timepoints
- To operate ZDC during TimeScan, tick the 'Enable ZDC AF during Time Series Scan' box in the Acquisition Setting control panel
- Press run experiment to start your time series (AF status will show “Searching…” during Focus Search)
- When the acquisition has finished click series done
ZDC in Multi Area Timelapse (MATL)
- Start MATL and set the Offset as described in the instructions for Single Shot Mode above
- Set the Z series Start, End and StepSize if required
- Return to the Offset Position by pressing the 'Move to offset pos' button in the ZDC Control panel
- Add the current position in the Multi Area Time Lapse Controller
- Move the stage and add more positions
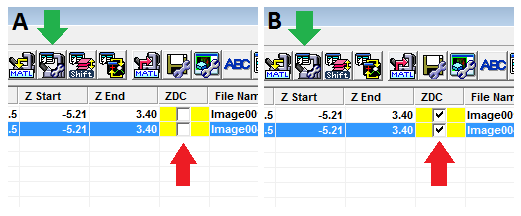
- Tick the ZDC boxes in the Registered Point List (red arrows in images below)
- Select the first point on the list and open Edit Acquisition Parameters...(green arrows above)
- Click the Set To Others... button to apply the Z series settings to all points
- In the TC[Set To Others Selecting] window, the 'ZDC Search Zone' box should be ticked
- The 'Z Position' box should not be ticked unless you want all the Z positions to be set to the same as the first position
ZDC in Continuous Mode
In Continuous Mode the ZDC stays permanently locked on a single plane. It cannot be used in combination with Z series.
- Set the Offset as described in the instructions for Single Shot Mode above
- Press Continuous AF in the ZDC Control panel
- The ZDC locks onto the AF plane, but this won't necessarily be the plane you are interested in
- Scan your specimen with Continuous AF on
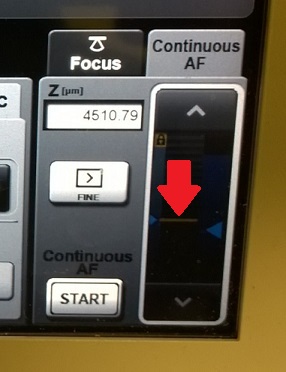
- Press the Continuous AF tab on the I3-TPC touch pad controller
- Press the Fine button on the controller to activate the fine focus (The red arrow in the image indicates the position of the Focus Limit)
- Adjust the focus until the plane of interest is in focus
- Press the Fine button again to reactivate the Continuous AF at this new position
- Start your imaging (AF status will show “Focussing” throughout the entire image acquisition)
Specimen and objective lens requirements for ZDC
The Olympus IX3-ZDC instructions specify that focusing is 'guaranteed' only with 35 mm glass-bottomed dishes. This doesn't necessarily mean that other specimens won't work, but you should always check to make sure your specimen is compatible with the ZDC.
In addition, the instructions also specify a list of lenses compatible with ZDC. The compatible lenses on the LMCB Olympus FV1200 are:
- UPLSAPO 20x (dry)
- UPLSAPO 60XW (water immersion)
- UPLSAPO 60XS (silicon oil immersion)
Again, other lenses might work but have not been tested.


