Openlab Quick Start
A quick guide to capturing images with Openlab
Openlab is a camera capture software for Apple Macs. The software still works on Macs running OSX up to and including version 10.6.8 but not newer versions so if a computer running Openlab is replaced or if the version of OSX is upgraded then Openlab will stop working. In that situation you would then need to learn how to use another capture software. Any data you have in Openlab format can still be opened and converted into other formats using Fiji and other software. This is intended as a quick guide to getting started in Openlab. More information can be found in the Openlab user guide.
Make sure the camera is switched on before opening Openlab, then click the Openlab icon in the dock.
![]()
Openlab user interface
The Openlab interface consists of a main menu, a document window and several free-floating palettes. The adjacent image shows the menu and document window. The document window has a bar on the left with tools that you can use to get a live preview (the display icon), capture images (the camera icon), digitally zoom on images, colourise them, etc. Initially the document window will be empty but the live preview and captured images will appear in here. There should be a few free-floating palettes. The most important ones are the Video Controls and Layers palettes. If they aren't on the screen they might have been closed or minimised to icons at the bottom of the screen. You can open them again by going to Windows in the main menu and selecting Palettes. All the available palettes will appear in a drop-down list but you only need the ones I've mentioned.

Video Controls and Layers Palettes
The Video Controls palette is where you set camera controls. The exact controls in the palette will depend on the camera but the most important parameters are exposure, binning, gain and auto contrast, although Openlab does not support auto contrast for all cameras. The layers palette is where icons of your images appear as you capture them. When you first launch Openlab there are only two icons in the palette, a blank white Original Image icon representing the empty document window and the Video Preview icon. If you click the Video Preview icon then the document window will display a live image of what the camera sees. Clicking the icon does the same thing as clicking the live preview tool in the document window tool bar. When you click the camera icon in the Document Window tool bar it snaps an image and a 'captured layer' will be added to the icon list in the Layers palette.

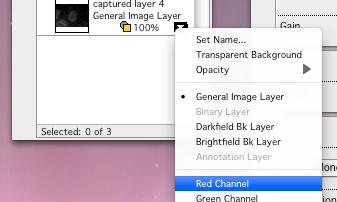
Colourising images and creating colour merges
Clicking on the little arrow on the right of a layer in the Layers palette opens a drop-down list where you can pick a colour from red, green and blue to apply to the layer. Once colours have been applied a new merge layer can be made by selecting the layers you want to merge and dragging them to the New button at the top of the palette or selecting 'Merge to RGB' from the Layers menu.
A bright-field image can be merged with fluorescence by placing it above the fluorescence layer in the palette, changing its opacity and then selecting 'Merge to Composite' from the Layers menu. Colours other than RGB can be applied using the colour swatch in the document window tool bar.
Merged images have a depth of RGB colour (or 'Millions of Colors' as Openlab calls it). Most images will be captured at 12-bit (Best Quality) or possibly 8-bit (256 Greys). This means that images in a document can have different depths. This isn't a problem for Openlab but it can be a problem for other programs like Fiji so it is best to make sure that any documents that will be opened in Fiji have images all at the same depth by splitting the grey and colour data into different documents.
Calibrating images in Openlab
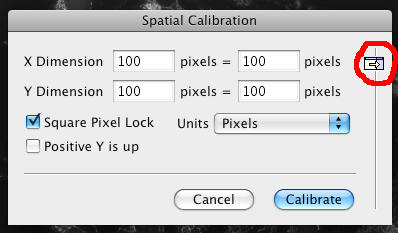
Click on Image in the main menu and select 'Calibration...' to open the Spatial Calibration dialogue box. Click the unobtrusive little arrow icon on the right of the box (ringed in red in the adjacent image) to expand a list of saved calibrations. These have been measured by light microscopy facility staff members so they may only include the most popular lens and camera binning combinations. If you want to use a different magnification factor (e.g. 4x binning, 2.5x optovar lens, etc.) then please email a request to the light microscopy facility. Select a saved calibration and click Calibrate. All images in the document will now be calibrated.
IMPORTANT: All the images in the document will have the same calibration so if you changed magnification or binning while capturing data to the same document some of your calibrations will be wrong. The best thing to do is to make sure all images in a document are captured at the same magnification and to open a new document if you want to change magnification.
Saving data in Openlab
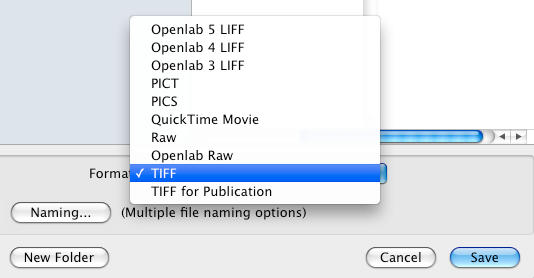
I would strongly recommend saving data in Openlab's native LIFF format initially so all image metadata is retained and no image data is lost. Openlab LIFF files (not to be confused with Leica's LIF confocal file format) are compatible with the Bioformats Importer so you should be able to open them in Fiji provided all the images in the file are at the same depth. You can also save in other formats like TIFF but the image metadata will not be retained so you will have to make a note of the image calibration. TIFF for Publication is a special format that saves the data at a depth of RGB colour regardless of what it was captured at. This is so images captured at unusual depths like 12-bit render correctly in basic image viewers like Preview and Windows Photo Viewer as well as in PowerPoint. TIFF for Publication images are for presentation only and should not be used for quantification.
'Save As Multiple...' saves layers separately rather than as a single layered file. You might find this useful if you want to save images as TIFFs to further process in photo editing software because Photoshop and GIMP don't support layers in the same way as scientific processing software. You must select the layers you want to save and you must define a Naming scheme for the images (e.g. by telling Openlab to sequentially number them).