MarcEdit Instructions for Cataloguers
Introduction
MarcEdit is an application that is used for the global editing of MARC records. We use MarcEdit to edit records for e-book packages which are provided to us by our e-book suppliers. The quality of the records supplied can vary greatly and we cannot aim to create perfect records using this method. Nevertheless, there is a lot that we can do to generally tidy the records up and also to ensure that certain basic settings are applied. The kinds of edits that need to be done tend to be very similar for all packages.
The editing tasks can be found in two menus in the MarcEditor: the “Edit” menu contains general tasks such as finding and replacing text, while the “Tools” menu contains tasks which are specific to the MARC format (i.e. anything dealing with MARC fields and subfields). Some tasks make use of “regular expressions”, a powerful text processing tool.
A useful feature is the ability to create a “Task List”. Using a Task List means that we can run a whole set of edits at once, rather than having to run each task one by one. As the kind of editing that needs to be done is broadly similar for most packages, it is often easier to copy a Task List which has been created previously and adapt it to the package you are dealing with.
File Management
Opening files
From the main MarcEdit menu open the MarcEditor and select Open from the File menu (or click on the folder icon) and navigate to wherever you have saved the .mrc file provided by the supplier and double-click on it to open it. If the file is large you will see an option to “Load entire file” in the top right corner of the screen. It is important to click on this to open the entire file before starting any editing.
Saving files
During editing it is a good idea to save the file as you are going along. The file should be saved in .mrk format at this stage (this is the default).
When you have finished all editing, the file needs to be compiled into MARC (.mrc) format.
It is important to note here that the .mrc file will be created from the last saved .mrk file, so always ensure that you have saved the file in .mrk format before compiling into MARC format.
To compile into MARC format go to the File menu and select Compile file into MARC. You will need to enter a file name, and select Save as type UTF-8 MARC File (*mrc) from the dropdown list of options.
Joining files
If you have two or more files which will be sent for loading at the same time, then you can join the files so that you only have one file to send to the Digital Libraries team for loading into Aleph.
This is done from the main MarcEdit screen i.e. the very first window that opens when you select MarcEdit (and where you would normally select MarcEditor). From the Tools menu select MARCJoin. You will then be prompted to choose two things: a Destination File and the File(s) you want to join. In the Destination File box click on the files icon to the right and navigate to wherever you want the merged file to be saved. You must enter a file name at this stage, as none will be provided by default. Click on Save. In the second box, File(s) (i.e. files to be joined), again click on the files icon to the right and navigate to where you have saved the files that you want to be joined. Select all of the files and click on Open. Underneath the Destination File and File(s) options the tickbox “Join individual files” should be ticked. To create your merged file click on Process and the file will be created in your chosen location.
Task Lists
To access existing task lists, or to create a new one, go the Tools menu of the MarcEditor and select Manage Tasks.
When the Task Manager window opens it is useful to maximise the window to get a better view.
The options available here are Task Actions and Manage Existing Tasks.
To create an entirely new Task List go to Task Actions and select Create New Task List. You will be prompted to enter a name for the new Task List. The new Task List will appear at the bottom of the list of existing task lists, so you will probably need to scroll down to see it. You can then select it and choose the option Edit Selected Task List. The Edit Task List window opens. Again, it is a good idea to maximise this window.
You will see four icons in the bottom left corner of the window, the first one being a “+” sign. Hovering your mouse over them explains what they are.
From left to right: Add a New Task – Copy Selected Task – Delete Task – Edit Task.
To add a task to your new Task List click on the Add a New Task icon and from the list select the type of task that you want to add. The most commonly used options here are Add Replace All Task, Add New Field Task, Add Delete Field Task, and Add Swap Field Task. For example, if you wanted to run the task which sets position 23 of the 008 field to s, then you would select the Add Replace All Task and then follow the instructions in Task 1 below. Clicking on Replace All will add this task to your Task List.
Continue to add tasks in this way.
Be careful with the order of some of the tasks. For example, if you need to take a print ISBN from a 776 field and convert it to a 020 field (see Task 10 below) and then delete the 776 field, you will need to ensure that the task to delete the 776 field comes lower down in your task list than the task which extracts the ISBN from that field. Similarly, if you need to delete a 533 or 590 field already present in a set of records then this will need to be done before adding our 533 Electronic reproduction and 590 Local notes fields.
When you have added all tasks make sure that you Save your Task List.
To run your Task List in the MarcEditor open the file that you want to edit and go to Tools – Assigned Tasks – Currently Available Tasks and select the Task that you want to run. Be aware that just selecting it will cause it to run immediately.
As many of the editing tasks for e-book packages will always be the same, it can be easier and quicker to copy an existing Task List and then adapt it to the package you are dealing with. To do this choose the Manage Existing Tasks option, select a Task List that you want to copy and select the option Clone Existing Task List. Once you have done this and given your cloned Task List a new name you will be able to edit the Task List and make any necessary changes.
NB. It is theoretically possible to run a Task List within a Task List, but in practice this does not work. Our Task List subjectdestroy for deleting non-standard subject headings should always be run, but rather than including it within another Task List always run it separately either before or after doing other editing.
Local Policy
Below is a short checklist of things that need to be edited or checked on all e-book records. It is not comprehensive for all packages, which will need to be checked individually.
FIXED FIELDS: 006 and 007
Retain these when found but do not create new ones.
FIXED FIELDS: 008
Position 23 of the 008 field is used to identify ebooks on UCL systems and should always be set to “s”. See Task 2
Note: Many libraries use the more precise codes “o” (for online resource) and “q” for (for direct electronic, i.e. physical medium). UCL currently doesn’t do so but may implement this in time.
ISBNS
All ISBNs associated with an e-book should be recorded in 020$a. Any appropriate ISBNs found in 020$z, 776$x, or elsewhere should be converted to 020$a. See Tasks 9 and 10
ISBNs for the print and electronic versions of the book should be included where they are present or easily found. The print version is important for matching with some external services, such as SFX and reading list software. If practical, a print ISBN should be the first one in the record.
GMD
The General Material Designation in the 245$h should always be removed. See Task 3
Reproduction Note (533)
Whereas most of the record for electronic versions of print books is the same as for the print edition, this note gives e-book-specific details. Delete any existing 533 fields before adding a UCL-specific one. Take details from the e-book’s web page and where possible for simplicity, find a set of details that are applicable across an entire e-book collection. Add the field as follows – See Task 7 - supplying any specific details to replace the angle bracketed sections:
533 \\$aElectronic reproduction.$b<Place of publication> :$c<Publisher>,$d<date of publication>. $nAvailable in <format> format.$nDescription based contents viewed <date of cataloguing>.
Date of publication: A generic copyright date for the website will suffice if necessary.
Format: e.g. HTML or PDF. More than one can be used if applicable. If a large collection has some e-books in one format and some in another, use “Available in <format> or <format> formats”. In other cases, sensible alternatives are fine.
Date of cataloguing: The date the collection was catalogued, even if the e-books themselves were actually viewed a short time earlier, and even if only a small proportion of e-books were actually viewed. Use the format “1 January 2015”.
Access Note (590/500)
For standard password protected e-books, add the following 590 local note – See Task 7 :
590 \\$aUCL username and password required for access.
For open access ebooks, add instead a 500 general note specifying the licence – See Task 7 e.g.:
500 \\$aThis book is published under a CC BY-NC-SA licence.
Tags (590)
Add the following tags in a single 590 note – See Task 7.
- Package tag. Formulate a preferably short and definitely distinctive package name (e.g. initials or abbreviation) and append it to “uclebk”, e.g. uclebkhart for Hart.
- Collection tag. If the package is divided into a number of collections (e.g. by subject or year), add further tags as necessary, repeating the package tag pattern with additions (e.g. uclebkhart2015) or formulating a new package-style tag depending on how the package is organised.
- Marc load tag. Use the distinctive package name but appended to “mrc” and with the date catalogued added to the end in the format YYYYMMDD. It is more important to make sure that records loaded together can be identified than that this reflects a strictly accurate date of cataloguing or adding to the catalogue. E.g.: mrchart20150512
Field Deletions
Below is a list of fields that commonly need to be deleted – See Task 4. Although it is often convenient to put these at the end of a Marcedit task list, some of them may need to be deleted prior to replacement by newer versions (e.g. 533 or 590) or after extraction of some data to other fields (e.g. 776 to 020); some others may be useful to retain in some circumstances, depending on the set of data and the cataloguer’s judgement (e.g. 520). Those with asterisks should be considered before deletion. Subject fields are dealt with separately below.
520*
530
533*
588
590
776*
975
Subjects
LCSH and MeSH subjects in 6xx fields should be retained and (if practical given the size and complexity of an ebook collection) added as for print books. All other subject headings should be deleted. There is a local task list- subjectdestroy- which should delete most unwanted subject fields, viz.:
648
653
655*
600 04 14 34 06 16 36 07 17 37
630 04 06 07 \7
610 04 14 24 06 16 26 07 17 27
611 04 14 24 06 16 26 07 17 27 \7
650 \4 04 14 24 \6 06 16 26 \7 07 17 27
651 \4 \6 \7
Naming Files
Filenames should be sensible and meaningful and should follow a roughly similar pattern to the tags for packages. Consider retaining filenames used by record providers in order to help track the history of files but feel free to rename if necessary, especially if it helps clarity and brevity. Filenames should always end with a reversed date in the format _YYYYMMDD. The underscore helps to distinguish the date from one that forms part of a downloaded one reflecting the collection or update name.
Submissions
Submit files to digital-library-support@ucl.ac.uk. If the file is likely to be too large to send by email- more than about 5000 records- use UCL’s Dropbox account instead. Files should always be in .mrc format.
Always specify the following information when sending records. If one of these is not relevant (i.e. there are no licensing conditions, explicitly say so).
- The name of the ebook package or collection.
- The number of records.
- The tag that identifies the specific collection and, if necessary, the wider package too.
- Any licensing conditions that mean we cannot send records to other services such as RLUK or SUNCAT. If you don’t know, assume there aren’t any.
- Whether the records should be sent to LTI for authority control. Generally, any collections with less than 5000 records can be sent unless the quality of the records is such that matches with LC headings are likely to be minimal, as there is a cost to sending records to LTI. For any collections over 5000, assess carefully what the proportion of matches is likely to be and check with Tom before sending.
Checking and Notification
Once the Digital Libraries Team has confirmed that the records have been imported to Aleph, please forward the email to Tom and make the sure the information under Submissions above is included or clarified as appropriate. Tom will notify Anna that these have been catalogued.
Tasks
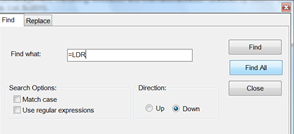
TASK 1 – Counting the number of records in a file
Edit > Find
Find what: =LDR
Find All
TASK 2 - Set 008 position 23 to s
Edit > Replace (Using regular expressions)
Find what: (=008 .{23}).
Replace with: $1s
Search Options: Use regular expressions

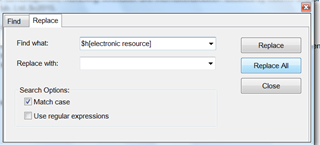
TASK 3 – Delete GMD
Edit > Replace
Find what: $h[electronic resource]
Replace with: blank
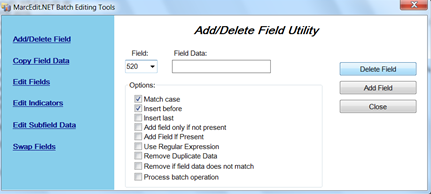
TASK 4 – Delete a field
Tools > Add/Delete Field
Enter the field you want to delete (e.g. 520).
Click on Delete Field.
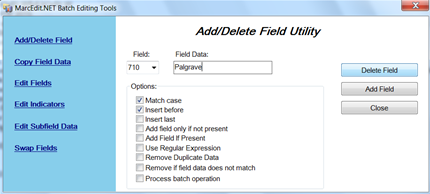
TASK 5 – Delete a field containing specific text
Tools > Add/Delete Field
For example, if you want to delete all instances of
710.2_ $a Palgrave Connect Online Tools
Enter 710 and in the text box enter some or all of the text. In this example it would be enough to enter just Palgrave.
Click on Delete Field.
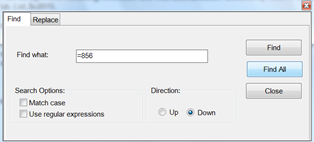
TASK 6 – Find all instances of a specific field
Edit > Find
For example, if you want to find all instances of the 856 field, enter
=856
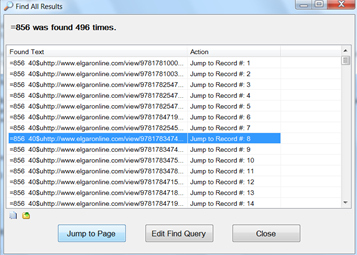
Click on Find All.
You can then browse through the list of all 856 fields found in the file.
If you want to view a particular record from this list, select it and click on Jump To Page.
TASK 7 – Add a field
Tools > Add/Delete Field
For example, to add one of our local notes fields:
590.__ $aUCL username and password required for access.
Enter the field tag 590 and then add the following in the text box:
\\$aUCL username and password required for access.
It is important to remember the \\. This represents the indicators. (In this example the indicators are blank.)

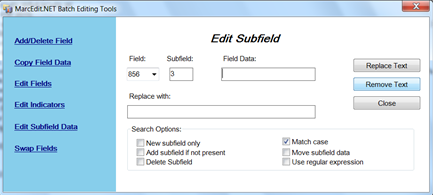
TASK 8 – Delete a subfield
Tools > Edit subfield
For example, to delete the following:
856.40 $3Palgrave
Enter 856 as the field, 3 as the subfield and click on Remove Text.
TASK 9 – Change 020 $z to 020 $a
The best way to do this is using a simple Edit > Replace:
Find what: =020 \\$z
Replace with: =020 \\$a
Note that there are TWO spaces between 020 and \\.

There is another way of doing this, but it can cause problems:
Tools > Swap Field Data.
020 \\ z (NB no dollar sign needed here)
020 \\ a
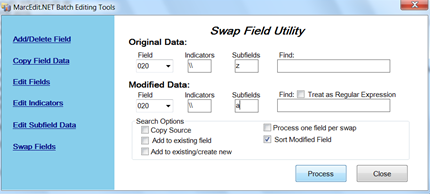
This can cause problems if the 020 field contains other subfields. The result can end up looking like this:
020 \\$a9781827364536
020 \\$qpaperback
Therefore prefer the simple Edit > Replace command above.
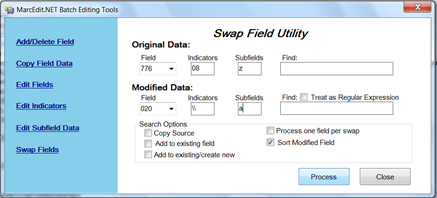
TASK 10 – Change 776 $z to 020 $a
Tools à Swap Field Data
Original Data:
Field: 776 Indicators: e.g. 08 Subfields: z
Modified Data:
Field: 020 Indicators: \\ Subfields: a
Tick the box Sort Modified Field
TASK 11—Separating multiple ISBNs in the 020 field
i.e. to change this:
020 \\$a9782736271836 (hbk.) 9781423153625 (pbk.) 9788675849383 (ebk.)
To this:
020 \\$a9782736271836 (hbk.)
020 \\$a9781423153625 (pbk.)
020 \\$a9788675849383 (ebk.)
This is done by using an Edit > Replace command using regular expressions:
Find what: (=020.*\$a.*?) (\d\d\d.*)
Replace with: $1\n=020 \\$a$2
And make sure that the tickbox for Use regular expressions is ticked.
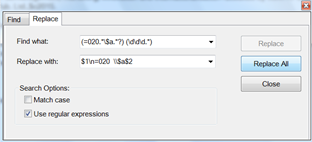
It is important to note that you need to run this as many times as necessary. Running it once will result in this:
020 \\$a9782736271836 (hbk.)
020 \\$a9781423153625 (pbk.) 9788675849383 (ebk.)
So you need to run it again to get what we want:
020 \\$a9782736271836 (hbk.)
020 \\$a9781423153625 (pbk.)
020 \\$a9788675849383 (ebk.)
So, repeat the command until you get the “0 modifications made” message. If you are using this command within a Task List remember to repeat it as many times as you think necessary.
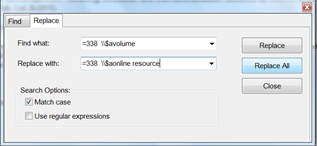
TASK 12 – Replace text
Edit > Replace
e.g. replacing 338 $avolume with 338 $aonline resource
Find what: =338 \\$avolume
Replace with: =338 \\$aonline resource