Assessing individual submissions
This guidance takes you through how to collect and assess individual students' MyPortfolio submissions and give marks and feedback.
If you are assessing group work then this guidance isn't for you - see our separate guidance.
In this scenario individual students, working in their own Portfolios, create a Collection of Pages. They then submit the Collection to a Group, where it displays only to the administrator there (assumed to be the tutor and any other assessor).
On this page:
Set up a place for students to submit to, and add students to it
Leave plenty of time before the deadline to do the following since you will need a MyPortfolio Administrator to set up a group for you, and some students may need to submit early.
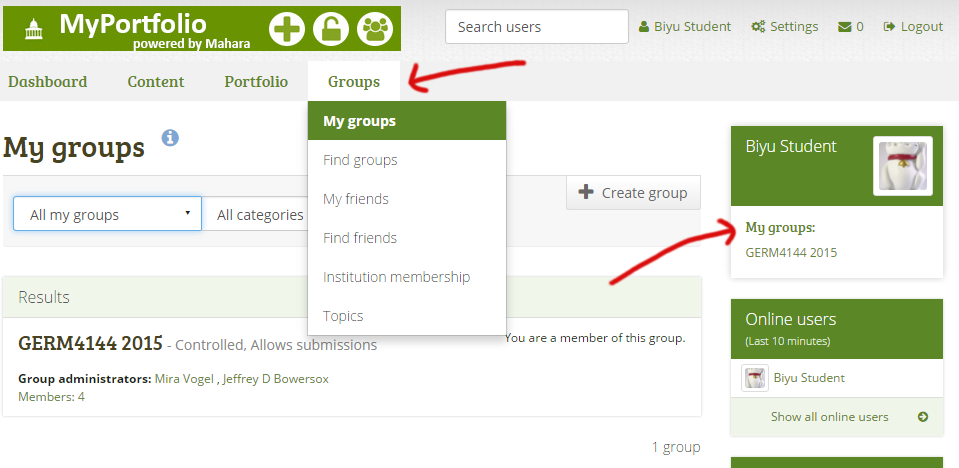
Contact your MyPortfolio Administrator (may be a local colleague known as a MyPortfolio Institution Administrator) with a request for a Controlled Membership Group - we suggest naming it as your course code and the year. If your cohort is small enough to add students to the group individually you can do this manually as follows:
- From the Group's menu click Members.
- Assuming your students are far enough along to have logged into MyPortfolio at least once already, you should be able to add them one by one by clicking the Add many users at once link (find this in the paragraph of text under the Search box).
- You can search for each student by ISD userid or by the most distinctive part of their name.
- As each search finds a student, select that student by clicking on their name and then use the arrows to move them from the Potential members column to the Users to be added column.
- Repeat until you have all the students you need in the Users to be added column.
- To save, click Submit (you can return and make changes at any stage).
- If there are too many students to add this way, ask your MyPortfolio Institution Administrator to do this by spreadsheet.
- Finally communicate with your students so they know what to do and when - see the next section.
Otherwise, if your cohort is too large to reasonably add each student to it individually, then you can add them by spreadsheet (they need to have logged into MyPortfolio at least one previously), or if you've run out of all other options you can contact Digital Education.
Set up a Moodle Assignment so you can get marks and feedback to students
- Submission types: students won't be submitting to Moodle (there will only be marks and feedback), so uncheck these boxes.
- Not anonymous (since students' work on MyPortfolio isn't anonymous).
- Feedback types: check the boxes for the feedback types you intend to give - see Moodle guidance for more on this.
- Make decisions about the other settings and save when you're ready.
- In the Moodle space Administration block, under Course Administration, click Grades; the Grader report displays (a matrix of students and assessable items, one of which is your Moodle Assignment).
- Click Turn Editing On; extra controls display for each item.
- From the top pulldown menu select Categories and items; the Categories and items page displays.
- You may need to scroll horizontally or search the page for the assignment you created above, but once you have found its column, click its Edit icon (a cog); its settings page displays.
- Click the Show more link to reveal the full list of settings.
- Find Hidden until check its Enable checkbox; the date/time fields become editable;
- Set the date and time that students should be able to see the grade and feedback.
- Click Save changes to finish.
- Let students know when and how to access their feedback.
To view students' work on MyPortfolio
Assessors view the work submitted to the Group as follows:
- Log into MyPortfolio.
- Navigate to the Group to which your students have submitted their work.
- On the Group's About page, find the work shared with the Group. Note that while Group Admins can see every student's work, each student, being in a Member role, can only see their own.
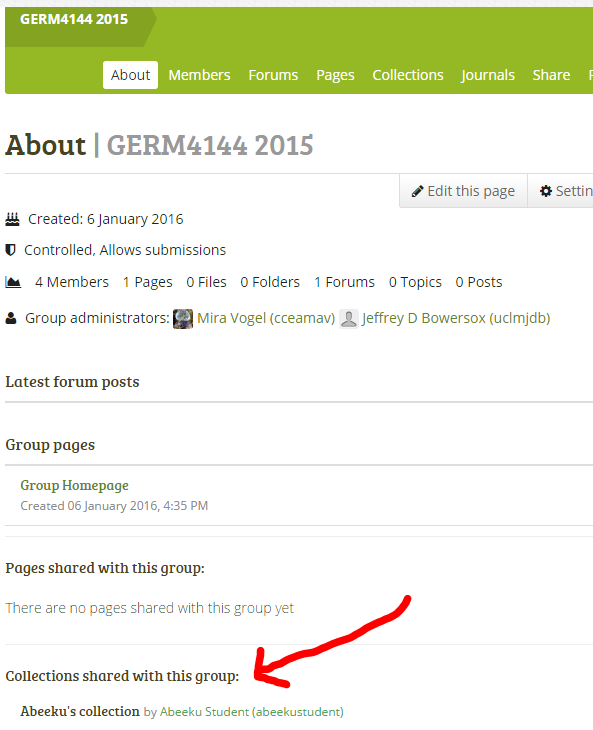
- Click on the name of each collection to access that student's work.
- Note the timestamp for the submission appears at the bottom of each Page of each Collection.
- If you are using a Moodle Assignment for marks and feedback as suggested above, you can keep that Moodle Assignment open in a separate browser tab and switch between MyPortfolio and Moodle as you make your comments.
To arrange access to other assessors
You will need to add them to the Group in a Group Administrator role.
To give comments on MyPortfolio
The Add Comment space is usually towards the bottom of each Page. You can use this to give feedback on work without actually editing it. Here's how it works.
Unless the Page's creator has set the Page not to accept Comments (see its Sharing settings) then anybody who can see the Page can comment. To do this, click the Add Comment link, type or attach comments, and then click the Place feedback button to post it under the Page.
What can you include in feedback? You can type text, insert links and also attach a file.
Who can see the feedback? The principle is that Page owners also own the Feedback on their Page. Correspondingly the Feedback owners ultimately relinquish control over whether the comment is public or not (though they can always delete the comment). So, whether the Feedback is public depends to some extent on whether the person leaving Feedback you have decided not to check the Make public box - but be aware that the Page owner can override this by choosing to make it public or to delete it.
If I uncheck the Public box, who can see Feedback I leave? Only you and the Page's owner. So, if the Page is owned by an individual, just that individual (this includes Pages in the Pages shared to this group by others category). If it's a Group page, then any Group member can see the Feedback.
How can I tell if Comments moderated? There's a statement under the Make Public settings.
| Top of page |
I have other questions!
See our 'Tutor & assessor questions and answers' resource.