Professional Experience MyPortfolio Induction
.png?version=1&modificationDate=1487351278000&cacheVersion=1&api=v2)
Intended for Professional Experience students and their tutors, this guide contains tasks and instructions to work through step by step.
Here you will find:
What's in this worksheet
In this MyPortfolio induction worksheet for staff and students you'll find out how to:
- Upload materials to MyPortfolio.
- Make a Page in your own Portfolio.
- Add the Page to a Collection.
- Display the Collection as a Navigation menu.
- Set up and display a Journal (blog).
- Make an assessor-friendly space.
Below, under most tasks, you will see 'Tell me how' next to a blue arrow head. Click there to reveal step-by-step instructions for the task - if you want or need them.
| Top of page |
Three main things to know about MyPortfolio

You have a personal Portfolio context (and a Group context but we won't cover that here - see the MyPortfolio Resource Centre for more).
Within either or both there are three stages to keep in mind:
- Create and upload Content or embed material hosted elsewhere on the web
- Arrange and present your Content within Pages - otherwise nobody can see it.
- Optionally share Pages – otherwise they remain private to you.
Photo credit: mag3737 via photopin - cc licensed.
| Top of page |
Why MyPortfolio?
Tell me why.
| Top of page |
How to access MyPortfolio
Keep this web page open and open a new tab in your web browser (keystrokes for this are Ctrl + t, or Apple key + t). In the new tab, go to https://myportfolio.ucl.ac.uk and log in with your UCL UserID. Depending on which browser you're using, you may be able to keystroke between the tabs by using Ctrl + Tab (right) and Ctrl + Shift + Tab (left).
Note that later on you can reach MyPortfolio via a side block in the Moodle course space for your project.
About Content – your personal filespace
From your own Portfolio context, click the Content tab, then from its sub-menu click Files.
Files are one form of content you can use in MyPortfolio – other forms are included as embeds, which we'll look at later on.
Remember, uploading content is the first stage - anything here is private to you unless you put it in a Page and share that Page.
Upload your files
The content you display MyPortfolio is either embedded from elsewhere on the internet or it's uploaded. Let's first look at uploading. Have an image and a document somewhere you can browse to them eg a USB drive or your N Drive.
No files of your own? Download some of these to your computer's filespace or to a USB drive: https://www.dropbox.com/sh/etxlxwkxsy65aw2/qV66fgFR0H.
Now upload the file(s) to MyPortfolio.
Tell me how.
| Top of page |
Make a Folder
Why make a folder? It can help you organise and find your files again. A folder can also be shared on a Page.
Tell me how.
| Top of page |
Move your File into your Folder
Tell me how.
| Top of page |
Move your File back outside your Folder
Tell me how.
| Top of page |
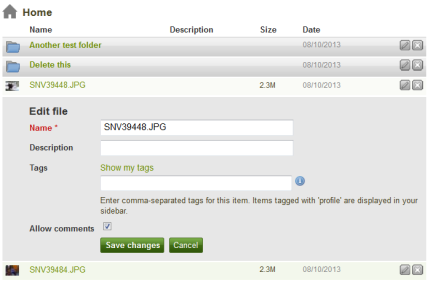
Editing files
Note that, when in your Files area, you can edit each File's name, description and other attributes by clicking on Edit (sometimes displays as a Pen icon, sometimes as a button).
Remember to Save any changes.
| Top of page |
Summary and next steps
We've covered uploading files, creating folders and moving files between folders.
Next - staying within your Portfolio let's now move on to displaying this content within Pages.
About Portfolio - working with Pages you'll show
Make a Page and add your image
Tell me how.
| Top of page |
Edit your Page's layout
Give your Page a different number or configuration of rows and columns than it started of with.
Tell me how.
| Top of page |
Summary and next steps
We've now created a Page and configured how its contents will be laid out. A little later we will create a Journal and embed that, but for now let's embed some media hosted elsewhere on the Web.
Embedding externally-hosted media into your Page
You may be using external web services to work with images, video, sound, infographics, timelines, visualisations - and more. Rather than forcing you to export, many hosts encourage you to share and embed. 'Embedding' means that the materials remain hosted in the original location, but can display in many other locations (and simultaneously if needed). Examples are YouTube, SoundCloud, and Flickr - all widely used at UCL.
Embed some external media
Working with YouTube for the sake of this exercise, embed some media hosted externally.
Tell me how.
| Top of page |
Troubleshooting embedded media
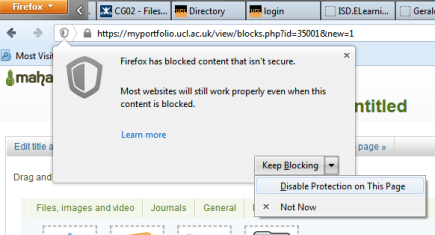
Video not displaying? Sometimes your web browser gets a bit paranoid. Look carefully - is there an alert asking you to enabled blocked content? One example is later versions of the Firefox browser. To display blocked content, on your browser's address bar click the little shield icon (or equivalent) and tell the browser you want to disable protection for the webpage.
Video still not displaying? You could try the External media block as an alternative which does similar things to Embed.ly and sometimes succeeds where it fails.
Still no joy? Some media hosts don't enable sharing in this way (it's usually easy to tell because there are no conspicuous links to Embed or Share) – in that case you can link to the page rather than embedding it. One way to do this is to use a Textbox block, which we'll look at next.
Putting a Text box block on your Page
Now you've added an image and embedded a video, next add a Texbox - this is the best way to add passages of text to a Page.
Tell me how.
| Top of page |
Making stuff for your Pages
You can find video, image hosting, timeline, infographic, mapping and calendar software pretty easily. Do check the terms and conditions, and keep in mind that you might need a contingency if the service isn't running when you need it.
Other than that you may like to refer to this lovely list of free, free-to-students, or free-to-try software curated by Alan Liu.
Summary and next steps
You now have an image, a video and some text on a Page for which you have allowed copying. Basically, anything you want to share with or display to others needs first to be on a Page.
Hopefully you can now infer how to include other kinds of files in Blocks within Pages. You can easily remove Blocks and delete anything you want to, so do experiment.
Now let's create a Journal, which you will use to keep a diary of your thinking and decisions during your project.
| Top of page |
Working with a Journal
Journals are like blogs - they let you log your thinking and progress over time, and configure who can see. You can have more than one.
First set up a Journal
You only have to do this once.
- Log into MyPortfolio eg at https://myportfolio.ucl.ac.uk; the front page displays.
- Note the row of tabs near the top of the page – click Content; your Profile Page displays.

- Note the second row of tabs under the first row. From it click on Journal; your Journal Page displays (and underneath that, some standard MyPortfolio information).
- Note that you have one Journal already – we’ll use that single one for all the entries (if you need another Journal, then click the Create Journal button.)
- Setting up the Journal is quick and easy. First it needs a proper title – click on Settings; the Settings page displays.
- Choose a Title.
- Description - this will display when the blog is embedded in a Page.
- Tags let you filter your MyPortfolio stuff by keyword - you can attach tags to an entire Journal and also to individual Entries.
- Click the Save settings button; the Journal front page displays again.
Next, create an entry
Now you can create your first Journal entry.
- Click the New entry button.
- Important - the Title of each entry should be the same as the task.
- Entry – now you can compose your entry. Below is guidance on using text, images, and embedded media in your Journal.
Add text to a Journal entry – helpful hints
As you might expect, you can type directly into the text field.
Note that you can make your editing space bigger by clicking the Toggle full screen icon – a blue square, in the toolbar (important hint - when you’re ready to save you need to click the same icon again to display the Save button).
Another important hint: when drafting text elsewhere (eg a word processor) then to avoid formatting compatibility problems use the Paste from word icon before you paste.
Save early, save often
There’s no autosave yet, I’m afraid, so remember to scroll down and Save entry as you go along.
This brings you back to the Journal page again – your entry displays and to edit it again you can click its Pen (Edit) icon.
How to add an image to a Journal entry
The following process could be more convenient - but it does work.
First you need to upload an image. Then, to embed it somewhere, you can copy its web address and it to embed.
- Unless embedding (see below) we need to first add the image as an attachment. First open the entry you need in Edit mode (via its Pen icon, for example – see above).
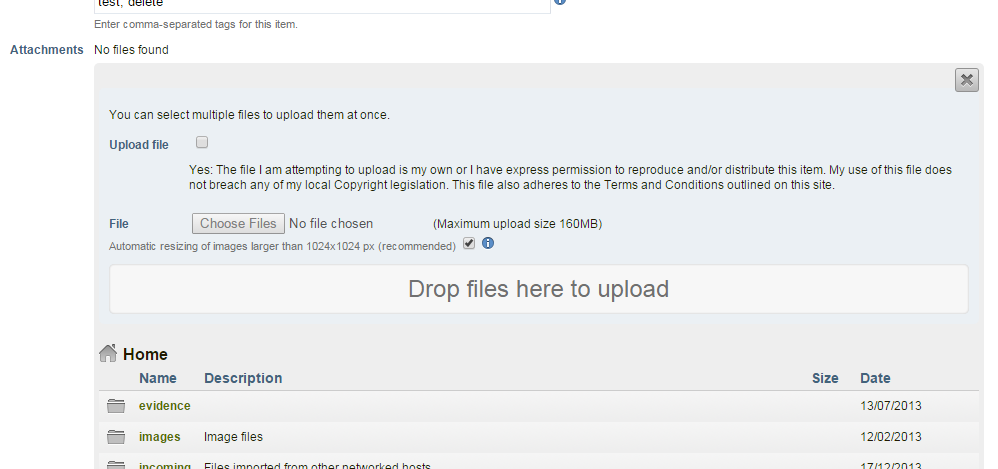
- Scroll if necessary to reach the Attachments setting for that entry, and click the Add a file button.

- The Upload file controls display.
- If you have folders, then browse to the one into which you want to upload.
- Check the Upload file checkbox to confirm you are observing Copyright; this then activates the Choose files control.
- Either drag & drop or click Choose files to browse your personal filespace (Dropbox etc not here just yet but coming soon), find the image you want to embed, and double click or similar; the Attachments settings display confirmation and the filenames display underneath.
- Once uploaded to MyPortfolio, the image is selected by default, and appears at the top with an adjacent Remove button:
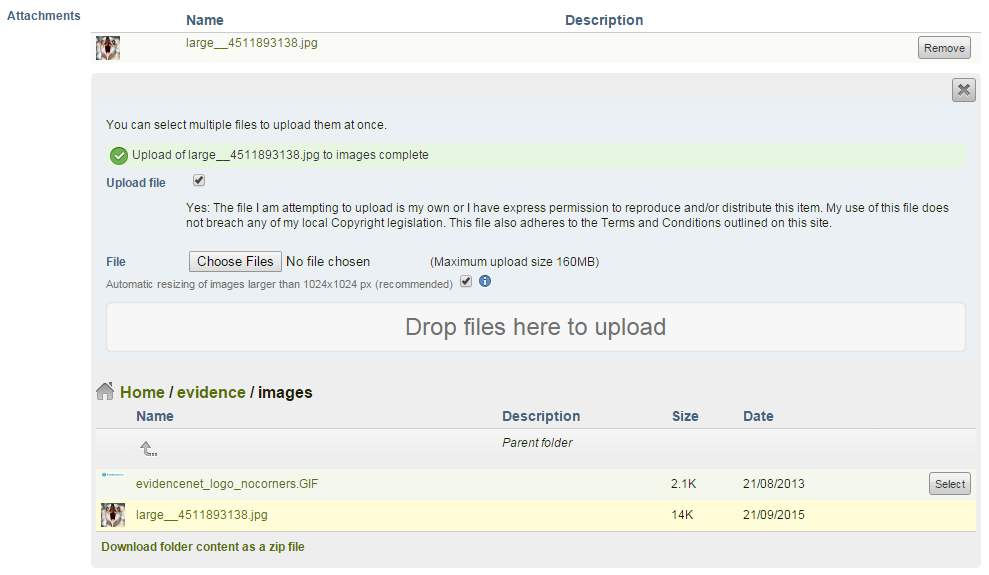
- At this stage the image is attached, but it is not yet embedded.
- To embed the image to the entry, first copy its address as follows - right click on the uppermost image title and from the context menu which loads, click on Copy link address.
- Now scroll back up to the Entry and from its text editor’s toolbar, click the Insert image icon.
- The Insert image settings display. Pull down the Attached image menu and from it select the image you attached earlier.
- Other settings:
Alignment specifies whether text wraps to the left, right, above or below – experiment with these.
Dimensions – leave these for now. Ideally you’ll have uploaded an image the dimensions you need, but if not you can resize later by dragging.
Border – a good idea. This needs a number – try 1.
Vertical space – usually this can be left, since the existing line spacing should create margins.
Horizontal space – if you’ve departed from the default Alignment settings, use Horizontal space to create a margin. It needs a number (of pixels) - try 7. - When you’re ready, click Insert button; the entry displays with the image in place.
- Need to edit the image again? Click on it within the entry, and while it is selected, click the Image icon in the toolbar again.
- Repeat as necessary.
- Remember to Save entry as you go along.
How to embed from the Web into a Journal entry
What if the thing you want to display is not an image, but something from the Web which can be embedded, like a video, infographic or timeline?
Some media hosts in common use in UCL – including YouTube, SoundCloud, and Flickr - explicitly encourage sharing and embedding. Let’s work through how to do this, using YouTube as an example.
- First, open a new web browser tab, navigate to YouTube open a video (any video).
- We need to copy its Embed information – this is easy, as follows. Find and click the Share link; then from the sub-menu click the Embed link; a snippet of software code displays for you to select and copy, (it begins <iframe…); carefully copy the code. This process is similar for most embeddable Web objects, though the details vary. You just need to find and copy that piece of code.
- Return to your MyPortfolio web browser tab, and the edit the Journal entry in question.
- Press the Return key several times to create some space.
- Next, click the HTML icon on the formatting toolbar; this displays the html edit mode.
- Scroll to the space you created – you can recognise it as a series of <p> <p>; click before or after the space.
- Now paste the snippet you copied earlier.
- Click the Update button.
- Scroll down and click Save entry to see the entry with the embedded media displaying.
- Not working? See below.
Troubleshooting embedding media
Video not displaying? Sometimes web browsers ask you (too subtly!) to enabled blocked content. One example is later versions of the Firefox browser. To display this content, on your browser’s address bar click the little shield icon and tell the browser you want to disable protection for the Page.
Still no joy? Some media hosts don’t enable sharing in this way – in that case you can link to the page rather than embedding it. One way to do this is to use a Textbox block, which we’ll look at next.
Summary and next steps
We set up a Journal and authored an entry, optionally with an image and some embedded media.
At the moment it resides in our own Portfolio’s content, and is private to us. Next we share it by embedding the entire Journal into a Page, as follows.
Next, insert the Journal into a Page
You only need to do this once.
Everything you want to share in MyPortfolio must first be inserted into a Page. Here is how to make one.
Make a Page and add your Journal (do this once only)
- From the top row of tabs, click on your Portfolio tab; your Pages tab displays.
- Click the Create page button; the new Page’s Edit title and description tab displays.
- Page title – important, this needs to be the name of the country you have been allocated.
- Omit Page description this time.
- Omit Tags this time.
- Ignore your Name display format this time.
- Click Save; the Edit content tab displays on the Files. Images and video tab – instead click on the Journals tab; an array of possible blocks displays.
- Hint – to find out more about any block, hover your mouse pointer over it and read the description which displays underneath.
- We’ll use the Journal block this time – it displays a number of entries in full. Click and hold on the Journal block and drag down until a dashed line placeholder appears – then let go.
- The Journal: Configure layer displays.
- Ignore Block title this time.
- Ignore Retractable and Automatically retract this time.
- Journal – click the ‘radio button’ adjacent to your Journal to select it.
- Keep the other settings as they are.
- Finally click the Save button; your Journal displays.
- One last thing – let’s change the layout. On the upper row of tabs, click the Edit layout tab.
- Select a 1 column layout by clicking its ‘radio button’
- Remember to scroll down and Save; the Edit content page displays again including your Journal.
Summary and next steps
We've now created a Journal, posted to it, and embedded the Journal into a Page. Next we'll consider how to help your assessors find their way around.
How to make an assessor-friendly space
Don't leave this to the last minute, since it relies on experimenting with layout and organisation of your pages. Your assessors will have 20 minutes to look at your MyPortfolio group work, so you need to make things as straightforward as possible for them. Here we make some suggestions about how to do that - but do remember to check your handbook to find out how you will get credit for your work here.
Include these elements in your Group's About page
Your Group About page is its homepage - the page which assessors, fellow group members and other views land on when they click on your Group's name. As such it's a landing page - a first impression and a signpost to the rest of the space. A welcoming Homepage could helpfully have the following elements (do check your handbook though, for any other elements you need to include):
- A list of sections you have identified as counting towards your 20 minutes for assessment. You could provide links to help the assessors quickly find the relevant sections.
- Brief introduction or overview – this could be a Textbox block.
- Some imagery might be appropriate – this could be an Image block, or an embedded video using one of the External Content blocks.
- Crystal clear navigation which provides both a top level overview of your space and also a clear path to reach each part – this might entail making a Collection of Pages and putting them into a Navigation block.
- A list of members – this would use the Group Members block.
- Group information – vital statistics about your Group work. This would use the Group Info block.
- The Recent Forum Posts block is there by default, but if you prefer, it can be added to a different page.
- No distracting superfluous blocks – delete these by going to your Group's Pages tab and editing the Group About page in the usual way.
- But try to avoid putting everything in one page since this can be very confusing for assessors. Instead experiment with layout and organising your materials into separate Pages. Use the aforementioned Collections with respective Navigation blocks in order to group related pages and signpost assessors through your work.
| Top of page |
And get rid of these elements before you submit the work
- Group pages block (which lists all Group Pages and optionally any Pages shared to the Group) - because you can't control the order. Be deliberate and use a Collection within a Navigation block instead.
- Dead Pages.
Do use Collections and Navigation
Why create a Collection?
Once you have more than a few pages, your assessors will need some signposts. Collections are groups of Pages which can be displayed as a menu on your Homepage (or any other Page) via a Navigation block. These are the best way to
- signpost and orientate your assessors and other readers.
- indicate a sequence and relationship between different Pages.
First you create the Collection, then the menus (as Navigation Blocks). The benefits here are if you eg change the title of a Page, the menu automatically updates, and if you add or remove Pages in the Collection, the menu automatically updates then too. So, if you think this would be helpful then do try to use Navigation blocks on your Group's Homepage.
Note that at the moment Pages can only exist in one Collection at once - so if you want to include a Page in more than one Collection, then create a copy of the Page - and best leave making the copy until you're certain that the original is finished – otherwise you'll have to carry out any edits on the copies as well as the original.
| Top of page |
How to organise Pages into a Collection
At this stage you have just a few Pages, so choose one group member to organise the Pages into a Collection - watch as they do it.
Tell me how.
Remember, everything you want to display needs to be added to a Page - including your new Collection. We'll do that next.
| Top of page |
Add a Collection to a Page with a Navigation Block
Next add a Collection to your Portfolio using a Navigation block. Once again, because we only have one collection, choose another different group member to do this and watch while they do it.
Tell me how.
Pages can only appear in one Collection at once. If you want a Page to appear in more than one, then copy the finalised Page and include separate copies in each Collection. N.b. if one changes, you do need to remember to duplicate the changes across any copies (sadly this can't be automated and needs to be done individually).
It makes sense to put Navigation blocks in the Page which will be the first encounter viewers have with your space - the Page which acts as a homepage.
| Top of page |
Summary and next steps
In this section we have considered the importance of the Group Homepage, and looked into setting up a Collection to display it on that Homepage as a Navigation block. This gives your readers (including assessors) an immediate impression of the contents of the space and a way to get to each part of it.
Next we will consider sharing and publishing.
Sharing or exporting to let others see your work
The following instructions publish work on the web (different from giving copyright - see the CreativeCommons block). Note that you can share Collections and individual Pages - if you have a series of interconnecting Pages, then ensure that all of them are shared to the people who need to see them e.g. your assessor. Your department should give you clear instructions here.
If you are asked to share within MyPortfolio
- Your department should let you know how and with whom to share your work.
- Make sure the Pages you are sharing are in the same Collection with a Navigation block included - that way you can share them all at once and their connecting links will reliably work.
- In your Portfolio, click the Shared by me icon; the Share page displays containing a list of your Collections and Pages with access settings.
- In the case of sharing with UCL users:
- select the Edit access (key) icon; to share with an individual User, scroll down to Share with users, use the Search menu to choose Users or Groups (or Friends, if they are your friends), and use the Plus icon to add the name to the right-hand pane.
- Repeat as needed.
- Pull down the Advanced options menu, check the settings and change as you see fit.
- Remember to Save.
- Or in the case of sharing with external users:
- Select the Secret URLs icon.
- Click the Add button; a URL is generated.
- Click its Copy to clipboard button to copy the link.
- Log out to test the link before sharing with an external person.
You may be asked to also export your work as an HTML zip file, so that UCL can observe its regulations to keep a copy of your work as it was at the time of the deadline. To do that:
- In your Portfolio select the Export tab; the Export your portfolio settings display.
- Again, make sure the Pages you are sharing are in a Collection.
- Select Standalone HTML website.
- Select Just some of my collections; select the Collection(s).
- Next select the Export button; a zip file will download according to the settings in your Web browser.
- You may want to check that you've exported as intended; to do that right click / apple-click on the zip file to extract the folder - only then will the links work; click Index file to open the front page to check a few links; n.b. it will look a little different from MyPortfolio.
- Submit the entire zip file as instructed by your department or tutor.
Allowing others to copy and adapt your work (CreativeCommons licensing)
Once you have made your Pages available to others, you can use a MyPortfolio CreativeCommons block to selectively allow copying, according to criteria you negotiate with your group.
What is CreativeCommons? See this by UCL student Michael Ruddlesden:
Video below not showing? It's probably a security setting on your browser - to reveal the video see instructions above for troubleshooting embedded media.
If you're allowing copying, then don't forget to also technically enable copying on your Page and any constituent parts from elsewhere - see aforementioned instructions.
Finally, delete all your experiments today
Delete anything not relevant to your project.
To delete Pages, go to the Portfolio tab and then the Pages tab. Use the respective Dustbin (delete) icons to delete the Pages.
To delete Files, go to the Content tab and then the Files tab. Use the respective Dustbin (delete) icons to delete the Pages.
| Top of Page |
What have we left out from this guidance?
If you're using this guidance as part of a workshop, then I need to mention that because of time pressures we've skipped over some good stuff including:
- What happens to your MyPortfolio work after you graduate? You can export the contents of your own portfolio either as a website or as a packaged up portfolio to be imported into another portfolio environment.
- Who owns the group's work? MyPortfolio takes this question very seriously – consequently (unlike your own Portfolio) it's not possible to export the content of a Group space. One way round this is to negotiate permission to copy the pages of a group into your own space, and reproduce the group work there.
- Your Profile – this is an important part of your online presence, especially if you're not yet acquainted with others in your Group. You get to this by clicking on the Content tab; your editable Profile then displays. To include a picture, click on the adjacent Profile pictures tab.
- To easily upload media from your own phone or tablet, there is the PortfolioUp! app for Apple devices and the MaharaDroid app for Android.
- Note your File storage allocation of 500Mb – use this carefully. In other guidance we explain how to avoid running out of space, and how to Export material from MyPortfolio.
- The limit for each individual upload is 160Mb.
See below for links to more guidance.
| Top of page |
Help!
Don't worry about asking questions – if you are struggling with an aspect of MyPortfolio, chances are that somebody else is too. Moreover, asking the questions gives E-Learning Environments a better understanding of how to support staff and students using MyPortfolio.
There are several alternatives – we'd recommend starting by asking people involved in your module (a group member or TA) and by using the community support forum.
- UCL Engineering's Matt Lever has made some video guides to MyPortfolio basics -https://www.youtube.com/playlist?list=PLWSHabhKjK-rz_rNanVKM3C_bW-uirIQM
- Guides at the UCL MyPortfolio Resource Centre - https://wiki.ucl.ac.uk/display/Mahara/MyPortfolio+Resource+Centre+-+home
- We'd recommend students contact their tutor and fellow group members in the first instance.
- Contact ELE - the support team can be reached via email ele@ucl.ac.uk, and via phone on 020 3549 5678020 3549 5678 (internal: 65678). Or you can contact your Faculty's E-Learning Facilitator (for SLASH that's Mira Vogel on 020 3549 5197020 3549 5197, internal: 65197).
- Mahara (the software we call MyPortfolio) has its own guides – we're on version 1.8 http://manual.mahara.org/en/1.8/
- Search YouTube - somebody may have recorded a screencast of what you are looking for.
| Top of page |
Examples of MyPortfolio pages
As well as those linked from the UCL MyPortfolio Resource Centre linked above, see below an annotated screenshot (PDF format) identifying the different elements of a Page.
- an annotated screenshot.
- Wikipedia in academia - a MyPortfolio group space open to logged in MyPortfolio users. Find it on MyPortfolio via Groups > Find groups > search term:Wikipedia
| Top of page |
Creative Commons licence details

This Digital Anthropology Mahara Induction by UCL ELE is licensed under a Creative Commons Attribution-NonCommercial 4.0 International License.