M06d - Bulk enrolment
Keywords: bulk enrolment, bulk unenrolment, auto group creation, groups
What is it?
Bulk enrolment allows you to enrol students or staff and/or add them to groups in a Moodle course using an Excel file containing their UCL email address or userid.
This can be useful before the start of the session, when Portico enrolments may not yet have begun, but enrolments are required. It also allows you to add students to groups with ease - the process will auto-create groups if they do not already exist on your Moodle course.
Who can use it?
Course administrators and tutors can use this feature.
Before I start...
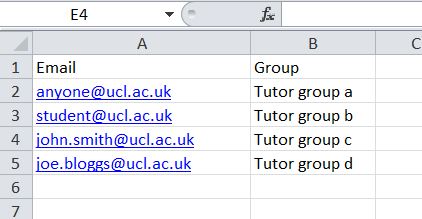
You will require an Excel file containing a complete list of the students' email addresses or user IDs in the first column. Subsequent columns contain the names of any groups you want to add each student to.
How do I use it?
1. Create your CSV
In order to upload users successfully, you will need to create a CSV file with the students' details. If you also want to enrol staff you will need to create a second CSV file for this, as each bulk enrolment can only enrol a single type of role (e.g. either students or tutors).
CSVs are simple to create - one way is in a spreadsheet package like Excel, making sure to save it as a .csv file-type.
As a minimum, your CSV file should contain one column for the main student identifier, usually their UCL email address, but it can also be their UCL user ID.
Ensure you have column labels - this is because Moodle anticipates these and so ignores the first row of the CSV file. In other words, don't put any actual student data in your file's top row. If you are using Email then type 'email', if you are using user IDs then type 'userid'.
If you want to enrol the students into Groups, include a second column which gives the group name for each student. Be careful to type these exactly. Give it a column heading 'group'.
2. Enrol the Students
Go to the Participants tab on the main course menu then choose Bulk enrolments in the drop-down menu.
.png?version=1&modificationDate=1690443495000&cacheVersion=1&api=v2&width=479&height=250)
- Click Choose a file and upload your CSV file.
- Make sure Role to assign is left as student, or change it to tutor (if uploading staff).
- Set First column contains to reflect the type of data you have used in your spreadsheet, either the students' email address or UCL userid.
- If you need to create groups, ensure Create group(s) if needed is set to Yes.
- If you would like to create groupings in your course, based on the groups that the students will been placed into, ensure Create grouping(s) if needed is kept to yes. If you do not want to create groupings, ensure this is set to No.
- To receive an email report confirming which students have been enrolled and which groups they have been placed into, keep Send me a mail report set to Yes.
- Click Enrol them to my course.
- Check the students have been enrolled in their groups by going to the Participants tab and then under the enrolled users drop-down menu, choose Groups.
- You should see the groups listed, followed by the number of students in each group in brackets.
You can also bulk unenroll students from your course by going to the Participants tab on the main course menu, then choose Bulk enrolments in the drop-down menu and follow the steps.
Further help
Further guidance on bulk enrolments is available from Modole Docs.
If you find any inaccurate or missing information you can even update this yourself (it's a communal wiki).
If you have a specific question about the tool please contact the Digital Education team.
Caution
The students you are enrolling must have already logged into Moodle, so this cannot be used to enrol first year students if they have never used Moodle.
Also, note the bulk unenrolment will not work for students who have been enrolled onto the course via Portico.
Examples and case studies
Uploading students and their personal tutors to a departmental Moodle course to enable them to schedule Personal Tutor meetings
You will need to create two excel files for this purpose.
- Create an excel file (saved as .csv) that contains a list of all your personal tutors.
- The first column will contain the personal tutor's email address or UCL userid.
- The second column will contain the group they will belong to. In this case the group will contain their name - e.g. Jo Bloggs personal tutoring group.
Note: although tutors can see all groups in Moodle, adding them to their own group will ensure this group is automatically selected on any activities with groups enabled. E.g. discussion forums.
- Upload this file to Moodle (using the steps outlined above), making sure the Role to assign setting is changed to tutor.
- Create a second excel file (saved as .csv) that contains a list of all your students, mapped to the personal tutor group.
- The first column will contain the student's email address or UCL userid.
- The second column will contain the group they will belong to. In this case the group will contain their name - e.g. Jo Bloggs personal tutoring group .
Note: students will need to be in the correct group in order to see any activities that are visible only to those group members. E.g. the scheduler tool that allows them to schedule an appointment with their tutor.
- Upload this file to Moodle (using the steps outlined above), making sure the Role to assign setting is left as student.
- Now you can set up any resources or activities (such as the scheduler tool) for each group and Restrict access , so only students in that group see the item.
Questions & Answers
Q. Why am I getting an error message when I upload the CSV file to Moodle?
A. Check the file is a .csv and not a .xls file, and ensure the First column contains field is set to UCL Userid or Email address.
This information is provided by Digital Education
( https://www.ucl.ac.uk/isd/digital-education-team-information ) and licensed under a Creative Commons Attribution-ShareAlike 4.0 International License
