M58 - Checklist
What is it?
Checklist is an open-source (GPL) activity module plugin that allows for a checklist to be created for students to work through.
Why use it?
The checklist allows you to keep students focused and on track to complete their course. It has a range of uses:
- Create a checklist of required and/or optional tasks, which students can check off and see their progress.
- Create a checklist where students can add their own items to create their own private checklist.
- Automatically generate a checklist for all the current course activities and resources, with the option to hide items.
- Keep students focused by adding dates to items, which will appear in the Moodle calendar.
- Teachers can view and comment on individual student progress.
- Teachers have the option to check off items for each student, e.g. to confirm progress has been made.
- Progress is stored in the Moodle Gradebook and can be exported from Moodle.
Who can use it?
Tutors and course administrators can create checklist activities, review student progress, check-off progress and comment on progress.
Students are able to view the checklist, check-off items and leave comments.
Before I start...
- Do you want students adding their own checklist items?
- Do you want due dates to appear in the calendar?
- Do you want teachers marking items as complete?
Meeting the baseline
The UCL Connected Learning Baseline suggests the following for Structure :
- 1.5 Guide students as to which task to complete next. This may include appropriate use of conditional release, so tasks are hidden until prerequisite tasks are completed, or until a certain date.
The Orientation category suggests that you:
- 2.2 Explain participation requirements:
- Identify which activities are compulsory and optional.
How do I set one up?
Add a Checklist activity
- Switch Edit mode on in your Moodle course, click Add an activity or resource in the desired section and select Checklist.
- Enter a Name and Description/Introduction (which you can optionally display on the course page directly).
- Most of the time you can leave a checklist on default configuration but there are some options to be considered under Settings.
- User can add their own items can be enabled to let students populate the checklist with their own items.
- Updates by can be toggled between student only, teacher only or both student and teacher.
- Add due dates to calendar allows for individual checklist items to be given a due date that's then displayed in the Moodle calendar.
- Teachers can add comments can be disabled if you don't wish to provide any feedback within the activity itself.
- Maximum grade can be set to 0.
- Email when checklist is complete can be set to send an email to the student, the teacher, or both the student and teacher.
- Show course modules in checklist can be set to pre-populate the checklist with the activities and resources from either the specific section a checklist is in, or the entire course. Please note: This doesn't include anything in the General section at the very top of your course, and doesn't filter items by group access restrictions. Please be aware if enabled, then additional resources and activities added to the course will also appear on the checklist as they are added.
- Check-off when modules complete is only applicable when showing course modules within the checklist. This will automatically mark a checklist item as complete based on the configured activity completion criteria, with the optional ability for the student to override it within the checklist.
- Lock teacher marks will restrict the ability to change the yes or no completion marking on a checklist item once a teacher has given a completion mark.
- If you're using completion tracking on your course, the Activity Completion criteria can configured to automatically mark the activity as complete when the percentage of items ticked off is set to 100%.
- Scroll to the bottom and click Save and display.
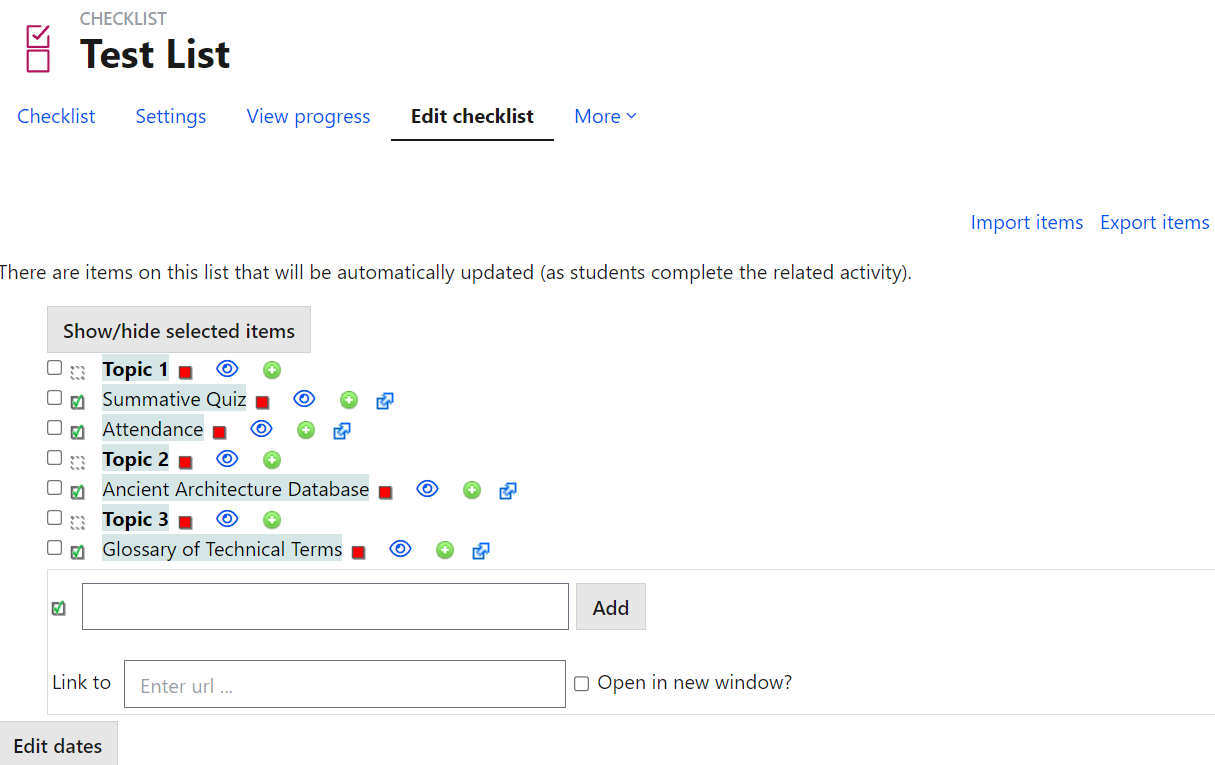
Adding and managing checklist items
- To add an item to the checklist, click the Edit checklist tab, type in the desired activity, then click Add.

- You can use Link to to link out to other areas of Moodle, or external websites, simply by providing the URL. If you intend on using this, consider if the content being linked out to is better placed in a reading list.
- You can click Edit dates if you wish to add due dates to checklist items. Please note you'll have to enable Add due dates to calendar in the checklist activity settings if you want students to see these dates outside of the activity.
- Once an item has been added to the checklist, you'll see some buttons either side of the entry to adjust how it appears.
- The checkbox next to the added item can be clicked to toggle between the item being required or optional, or a heading within the completed checklist. Optional items will appear greyed out to students.
- The text colour square can be clicked to toggle between a small range of preset colours. We recommend against doing this on the grounds of accessibility.
- The eye can be used to show or hide an item.
- The green plus symbol can be used to add an entry directly below that item in the checklist.
- You can preview a checklist by clicking the Checklist tab.
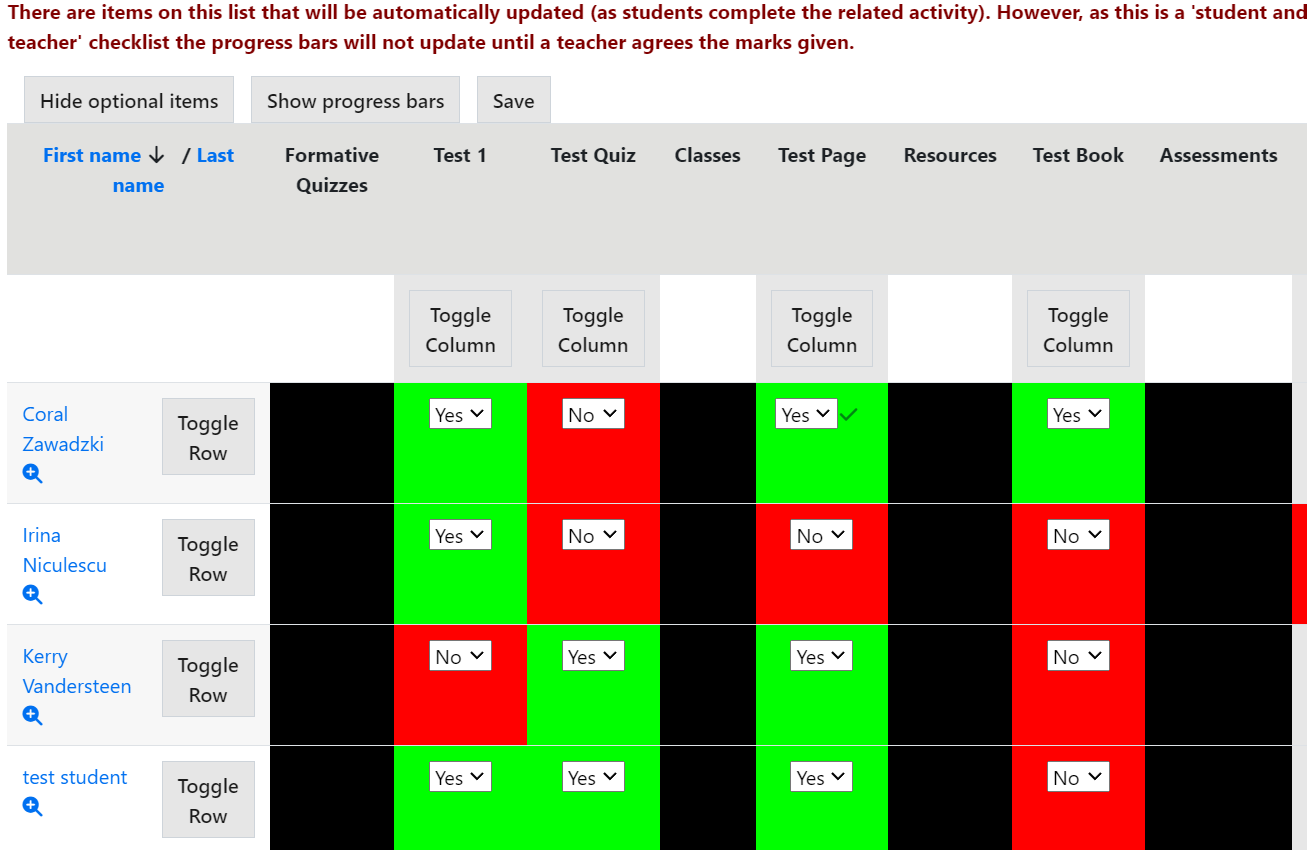
Viewing and updating progress
- Once your finished checklist is in use, you can use the View progress tab to view student progress and provide teacher marks if you've enabled that option
- You'll be presented with a detailed grid view that has a row for each student and a column for each checklist item.
- If you require a simple progress check, click Show progress bars to see a percentage total for each student.
- You can hide optional items by clicking Hide optional items.
- To edit checks, click Edit checks and use the drop downs to set the check as blank, Yes or No.
- Setting the check to No will leave a red cross in the box once saved.
- You can use Toggle Row and Toggle Column to quickly mark one checklist entry or one student as blank, yes or no for everything. Please note that this overrides any existing marks.
- Once you've completed any changes, click Save.
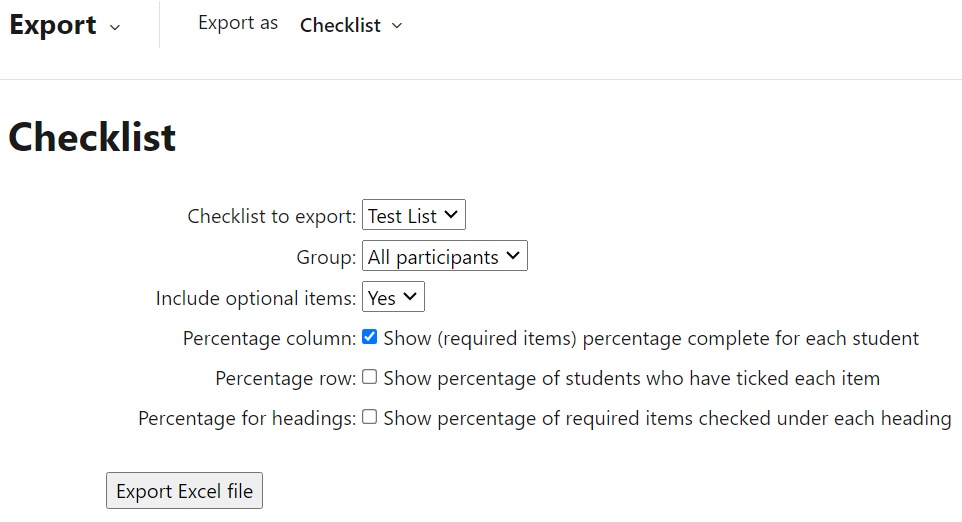
Exporting checklist completion
All the checkmarks from a checklist activity can be exported into an Excel spreadsheet.
- Within the course with the checklist, click the Grades tab at the top of the site
- Click the Grader report dropdown menu and select Export
- You'll then be presented with six options to customise the Excel spreadsheet export:
- Checklist to export can be used to specify which checklist activity to export checkmarks from
- Group can be used to specify groups to include in the report
- Include optional items toggles showing optional items in the export
- Percentage column toggles showing the completion percentage for required items
- Percentage row toggles showing the percentage of students who have checked each item
- Percentage for headings toggles showing the percentage of required items checked under each heading
- Once you've got the export configured, click Export Excel file.
- The spreadsheet will then download with the default naming of Course full name + checklist activity name
Checklist block
You also have the option to include a block on your course that shows a summary of progress within a specified checklist activity, or all checklist activities on a course (if applicable).
- Within your Moodle course switch Edit mode on.
- Open the block drawer on the right of the screen, click Add a block, then select Checklist.
- Once the block is added on your page, scroll to the Checklist block, click the settings cog and select Configure Checklist block.
- There are three settings under Block settings but you can leave them as the default if there's only one checklist on your Moodle course.
- Checklist overview can be set to Yes if you wish to show an overview of progress on all checklist activities.
- Choose checklist can be used to specify a checklist to show within the block if Checklist overview is set to No.
- Default group can be left as the default settings.
- Click Save changes.
If your checklist block is configured to show progress for a specific block, this is what you will see. Clicking onto a student's name will take you to their progress within the specified checklist activity.
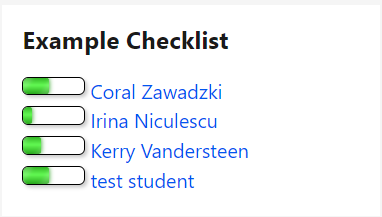
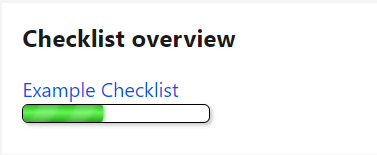
If your checklist block is configured to show an overview of all checklist activities in a block, this is what you will see. Clicking the checklist title will take you to that specific checklist activity.
In both cases, students will only see their individual progress, and not that of other students.
Examples and case studies
-
Questions & Answers
-
Further Information
See Moodle's documentation on the Checklist activity.
This information is provided by Digital Education
( https://www.ucl.ac.uk/isd/digital-education-team-information ) and licensed under a Creative Commons Attribution-ShareAlike 4.0 International License
