M60 - Zoom Meeting
What Is It?
Zoom Meeting is an open source (GPL) plugin that allows for the creation and joining of Zoom meetings directly within Moodle.
Why Use It?
Zoom can be used for a variety of teaching and learning activities, including seminars and interactive group study, Q&A discussions, guest lectures, and tutorials. It provides a range of different functions in a live, or synchronous, learning environment. These features include:
- Audio and video conferencing;
- Presentation and whiteboard facilities;
- Application sharing;
- Text chat for student discussion and questions;
- Tools for hand-raising and reactions;
- Polling;
- Breakout rooms for small group activities.
Who Can Use It?
Course administrators and tutors can add a Zoom Meeting to their Moodle courses.
Students can join a created Zoom Meeting from their Moodle courses, plus they will also appear in their Moodle calendar.
Before I Start...
PLEASE NOTE: By default Zoom meetings will NOT be recorded. You need to manually activate recording when you start a Zoom meeting.

Consider if you should be using Zoom, Microsoft Teams or Lecturecast for teaching. Zoom was introduced as another option for remote teaching. The teaching platform you choose will depend on a variety of factors including teaching requirements, the course subject, and – critically – whether your live sessions include students who are based in China. To help you understand which platform is best suited for you, we have outlined the core functionality, benefits and considerations of Zoom, Microsoft Teams and Lecturecast on the Choosing the right platform for live teaching webpage.
Meeting the Baseline
The UCL Connected Learning Baseline suggests the following for Orientation :
- 2.2 Explain participation requirements
- Identify which activities are compulsory and optional
Provide an indicator of effort (such as timings or page counts) for all compulsory tasks
- Explain how students are expected to use UCL and external e-learning tools. Wholly online courses might provide this information as a screen-cast video, with a voice over
Link to instructions for any e-learning tools that students are expected to use.
For Student Active Participation it is suggested that:
- 9.1 Students can share learning resources either individually or collaboratively using online tools (such as wikis, glossaries, databases and discussion forums).
How Do I Set One Up?
Adding a Zoom Meeting
The process to add a Zoom meeting is straightforward, with one meeting activity required by per meeting you wish to take place. There are several options for configuring meetings on Zoom but we recommend using the default values.
- Navigate to your Moodle course and switch Edit mode on.
- Find the section you wish to add a Zoom Meeting into and click Add an activity or resource.
- In the activity chooser, select Zoom meeting then press Add.
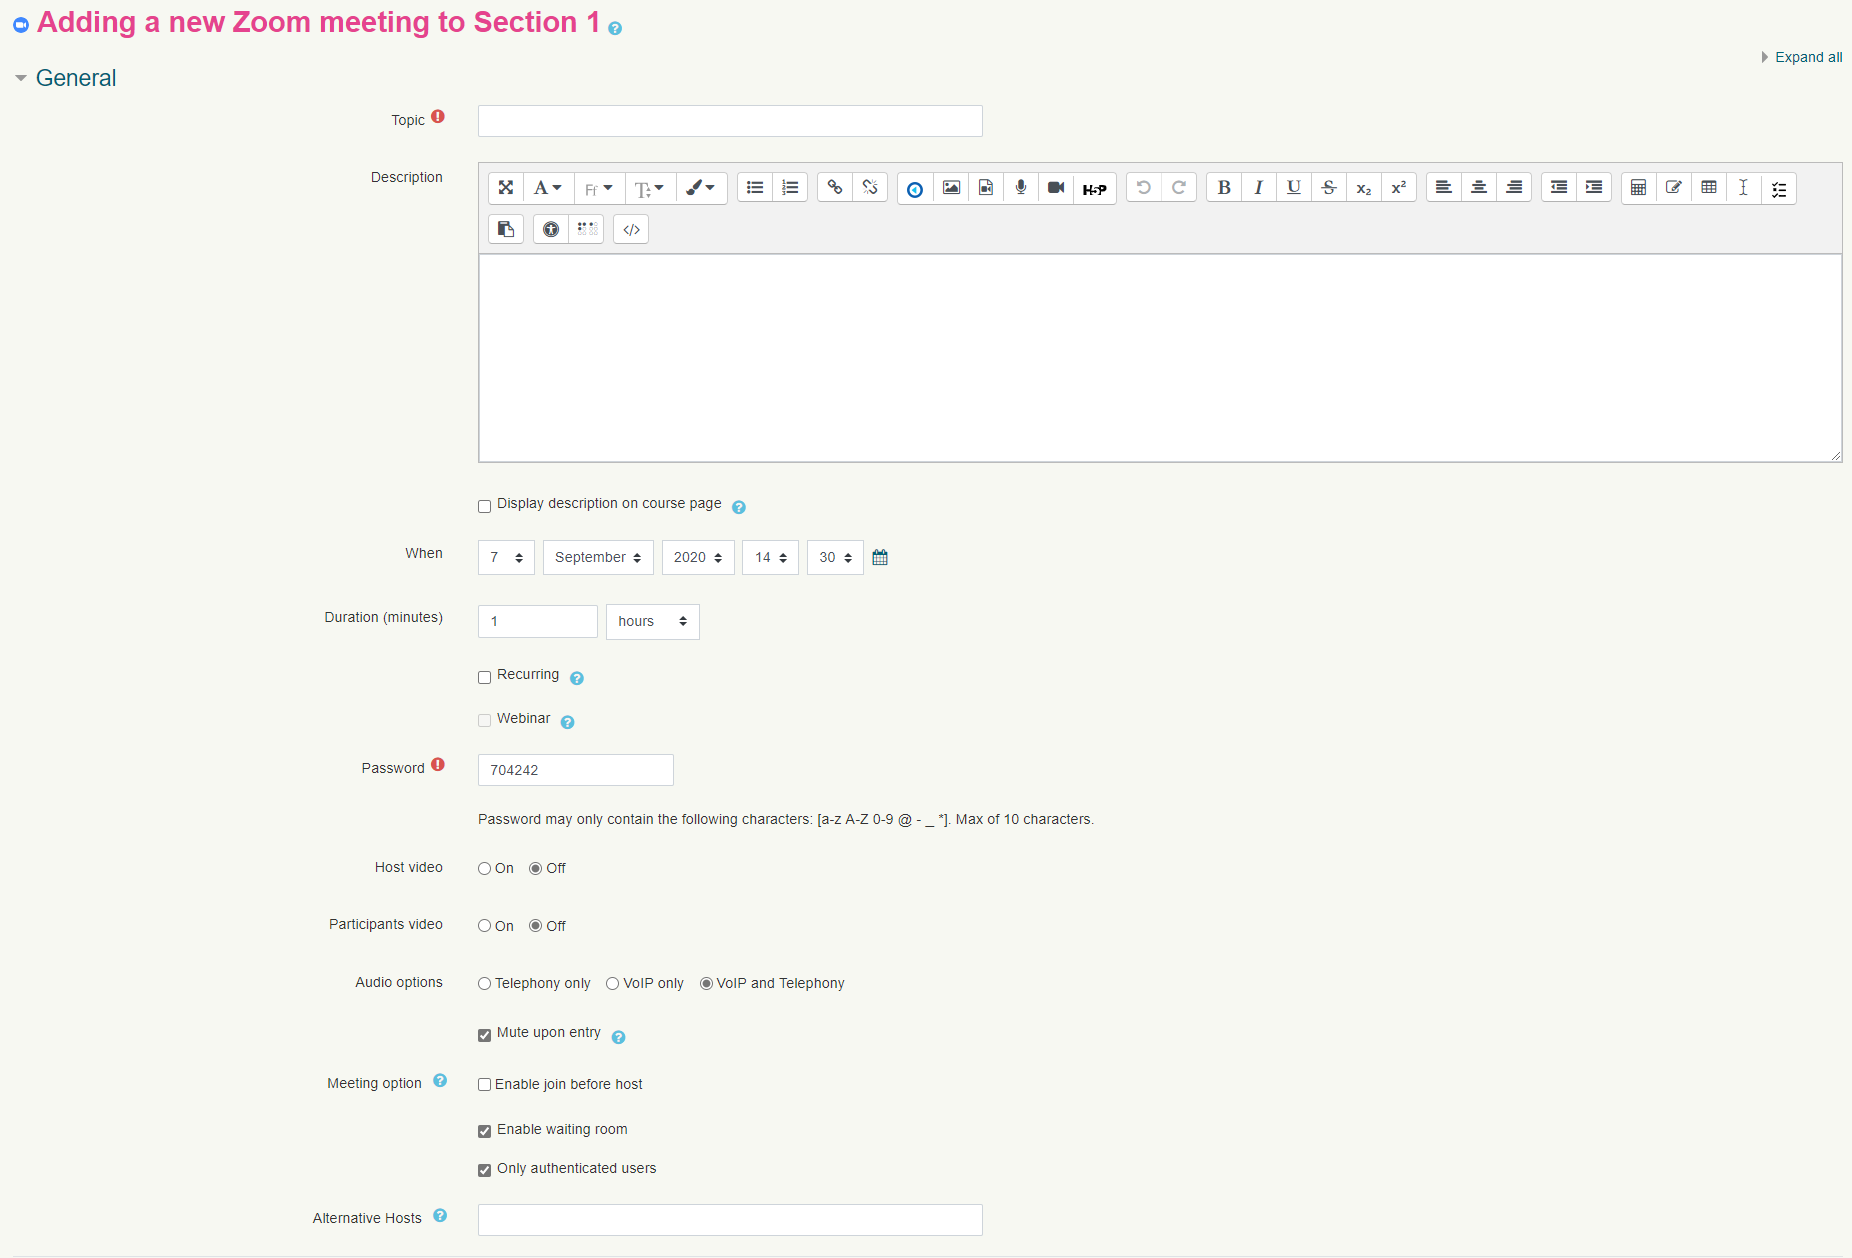
- You'll then see a list of settings for configuring your Zoom meeting:
- Topic lets you set the title for your meeting and this will be the name shown to students
- Description lets you set a description for the meeting
- When lets you set the date and time of your meeting which will also appear in the Moodle calendar
- Duration (Minutes) lets you set how long the meeting will be
- Recurring lets you create a meeting with no end date
- Webinar lets you create a webinar but your account has to be pre-authorised for this. (If you believe you require a webinar license please contact zoomsupport@ucl.ac.uk for further details)
- Password sets a password for joining the meeting and this is both required plus populated by default. It is recommended that you use the default password. If you enter your own password ensure it is longer than 8 characters and has a combination of letters, numbers, upper and lower case.
- Host Video and Participants Video toggles whether the web cam of each is enabled or disabled when joining the meeting
- Audio Options lets you set if students can join the meeting by phone, computer or both
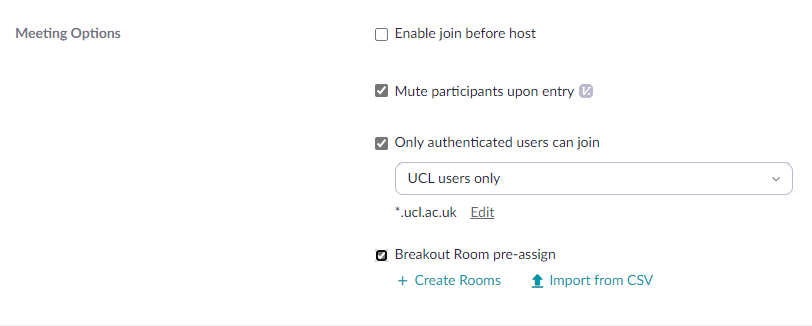
- Meeting Options
- Enable join before host. Please note that participants will have full permissions to share audio/video and screen by default.
- Enable waiting room. Participants in the session will be placed in the waiting room until the Host or Alternative Host joins. When the Host or Alternative Host joins, UCL Zoom account holders will be automatically permitted entry into the session. Non UCL users will remain in the waiting room, for the Host or Alternative Host to admit.
- Only authenticated users. If enabled, only UCL Zoom account holders can access the Zoom session. If you are likely to have guest lecturers, see Managing Guest Lecturers below.
- Alternative Hosts lets you set additional hosts for the meeting by their UCL e-mail address. Please note that Alternative Hosts do not have all the same permissions as Hosts, see Zoom's guidance on Roles. If you are scheduling on behalf of another user, please see Scheduling on behalf of another user below.
Breakout Rooms
Currently you're unable to create and pre-assign breakout rooms within Moodle directly, but once you're meeting is scheduled, you can add these within Zoom itself.
- Schedule a meeting within Moodle using the steps above.
- Sign into Zoom directly using the single sign on system at ucl.zoom.us. (Please note you can only preassign Breakout groups in the Zoom web portal. The options do not appear in the Zoom Desktop App).
- Find the meeting within Zoom and press Edit.
- Scroll down to the bottom of the page and tick Breakout Room pre-assign in the Meeting Options section.
- Use the Import from CSV function to upload a CSV with the desired rooms and participants.
- Upload your CSV with the desire breakout rooms and participants.
- Zoom provides a handy template on their own support which you can download here.
- Use the left column to enter room names and the right column to enter students via their UCL e-mail address.
- Press Save at the bottom of the page.
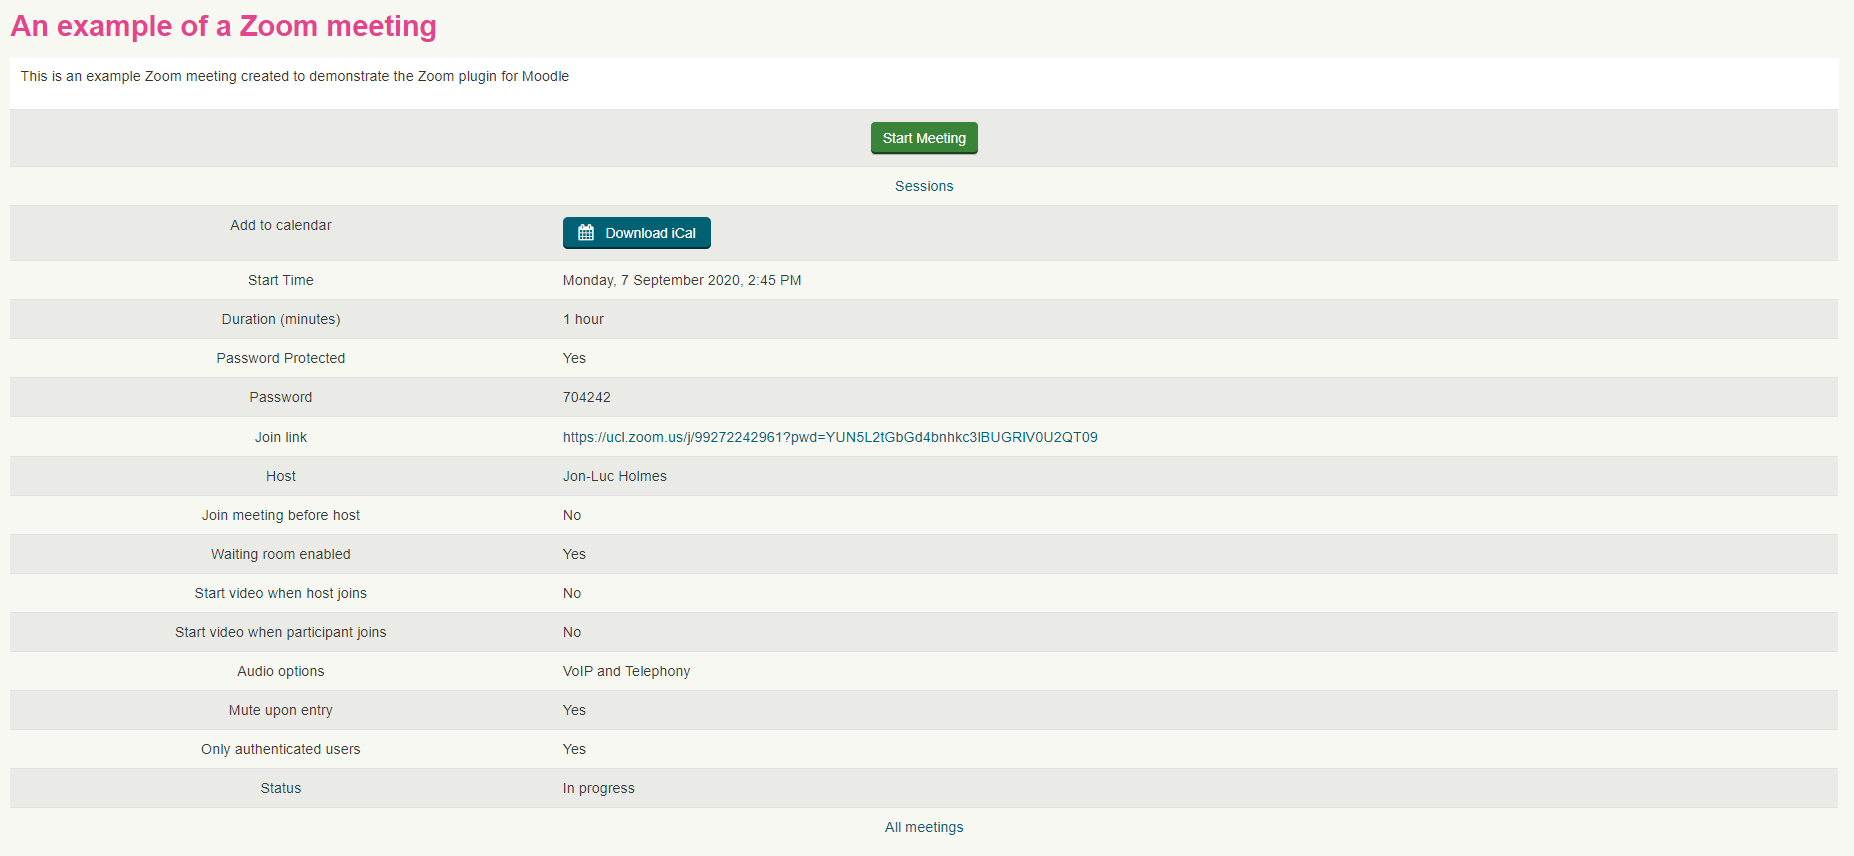
Starting or Joining a Zoom Meeting
Once you have created Zoom meetings within your Moodle course, starting or joining these meetings is a quick process. Please note the button to start a meeting as host, or join as a participant, won't appear within the Zoom meeting activity until 15 minutes before the scheduled start time.
- Navigate to the Moodle course containing your Zoom meeting and click the activity link.
- Alternatively you can use the Moodle calendar to navigate directly to the Zoom meeting.
- Click the Start Meeting button as host or Join Meeting button as a participant
- You will then be taken through to Zoom's website, which will then open the Zoom application, or prompt you to download the application.
- The Zoom application is available for Windows, macOS, Android and iOS.
- The Zoom application is available for Windows, macOS, Android and iOS.
Managing Guest Lecturers
Before the session:
- Create your Zoom meeting in Moodle with the following two settings to allow non UCL users to join the session.
- Untick Only authenticated users (this will allow anyone without a UCL Zoom account to join the Zoom session. This includes users who have not signed up to Zoom).
- Tick Enable waiting room (ensures everyone who joins the session is placed in the waiting room).
- Save the meeting.
- On the meeting page, copy the Join Link and send it to the Guest Lecturer. Be careful with sharing this link as anyone with the link can join the session, whether or not they have the password.
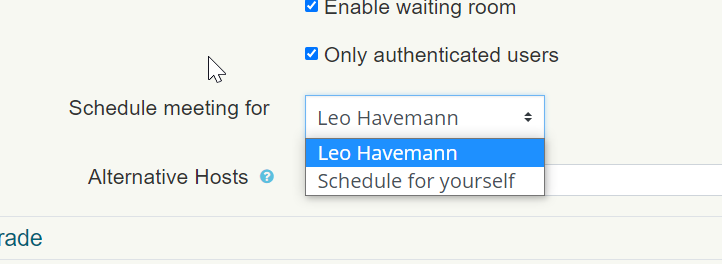
Scheduling on behalf of another user
Any course administrator creating Zoom Meetings on behalf of lecturers must request scheduling privileges from the intended Host before creating the Zoom meeting.
The intended Host can grant the administrator scheduling privileges as explained in the Zoom guide on scheduling privileges. The Host must be registered with a UCL Zoom account, and they must be enrolled as a Tutor onto the Moodle course where the meeting is created.
Once scheduling privileges are granted, the administrator can create the Zoom meeting as per the instructions above, with the additional option now available to schedule on behalf of another user, as shown below. Please note the drop down menu will only show Tutors who are enrolled on the Moodle course.
During the session:
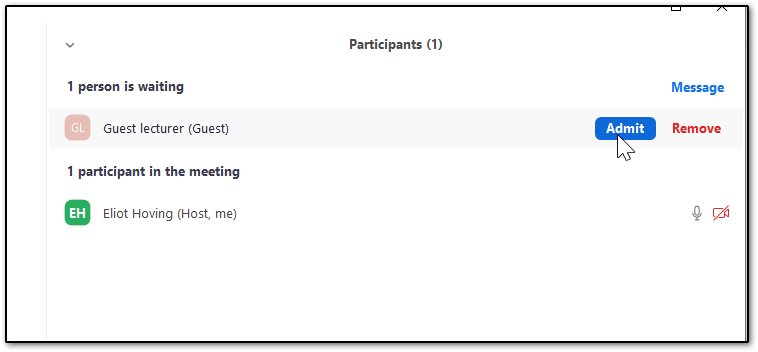
Participants in the session will be placed in the waiting room until the Host or Alternative Host joins. Once the Host or Alternative Host joins, UCL users will be automatically permitted entry into the session. Non UCL users will remain in the waiting room, for the Host or Alternative Host to admit.
There is a small chance that someone might join with the same or similar name as your guest lecturer, so before admitting a user, please liaise with your guest lecturer so that you know you are admitting the correct person. You should never need to admit a student as they should join with their UCL Zoom account and thereby bypass the waiting room.
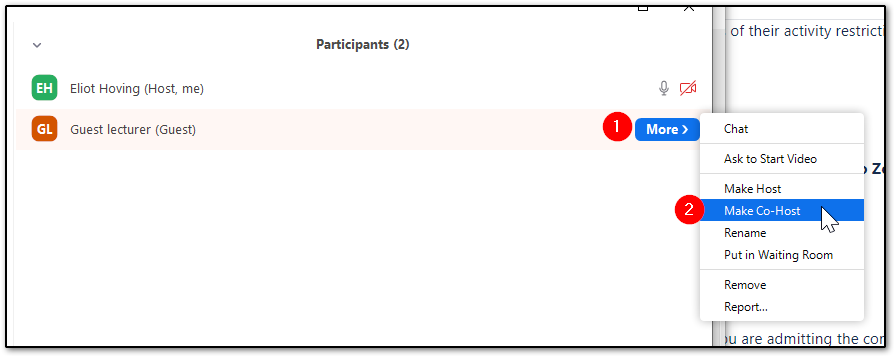
When your guest lecturer joins successfully, you can elevate them to co-host so they can share their screen to present.
Recording the Zoom meeting
Select the Record button within the Zoom meeting, to record the meeting. (If you do not manually record your Zoom meeting, you will be unable to receive a video recording of the meeting).

Zoom Recording in Lecturecast
Starting on Friday, August 4th, 2023, your Zoom recordings will no longer be automatically ingested to your Lecturecast (Echo360) library unless you choose to opt-in. However, if you choose to opt-in, all your Zoom recordings will be automatically saved within Lecturecast.
Below, you'll find the steps for selecting the option to automatically ingest Zoom recording into your Lecturecast/Echo360 library.:
Step 1: Log in to Lecturecast ( Echo360 )
Step 2: To opt-in, click on the 'cog' icon that is located towards the top right of the screen and click on the ‘Account Settings’ option.

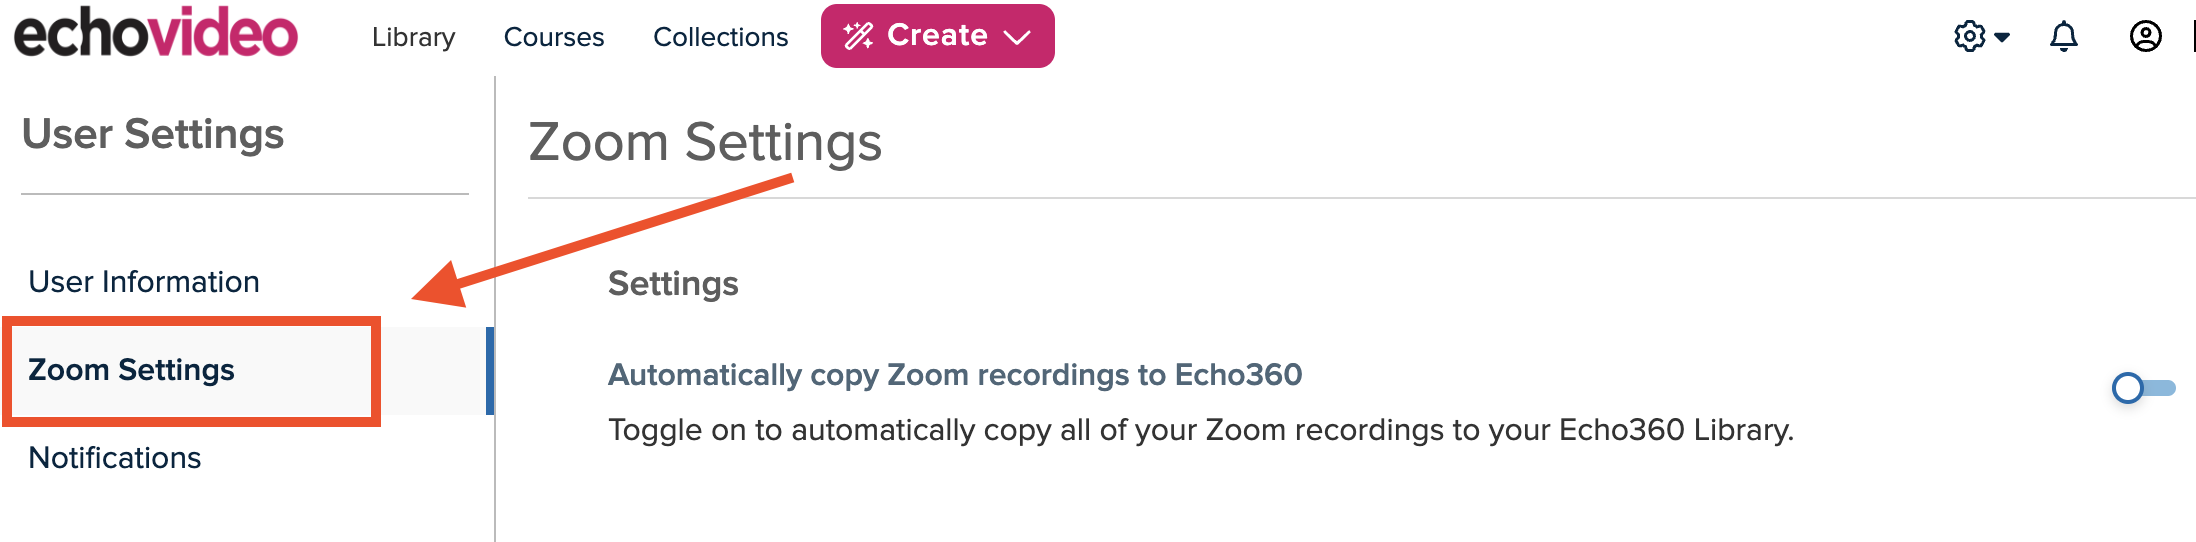
Step 3: Once the 'Account Settings' screen opens, click on the ‘Zoom Settings’ link from the left-hand menu.
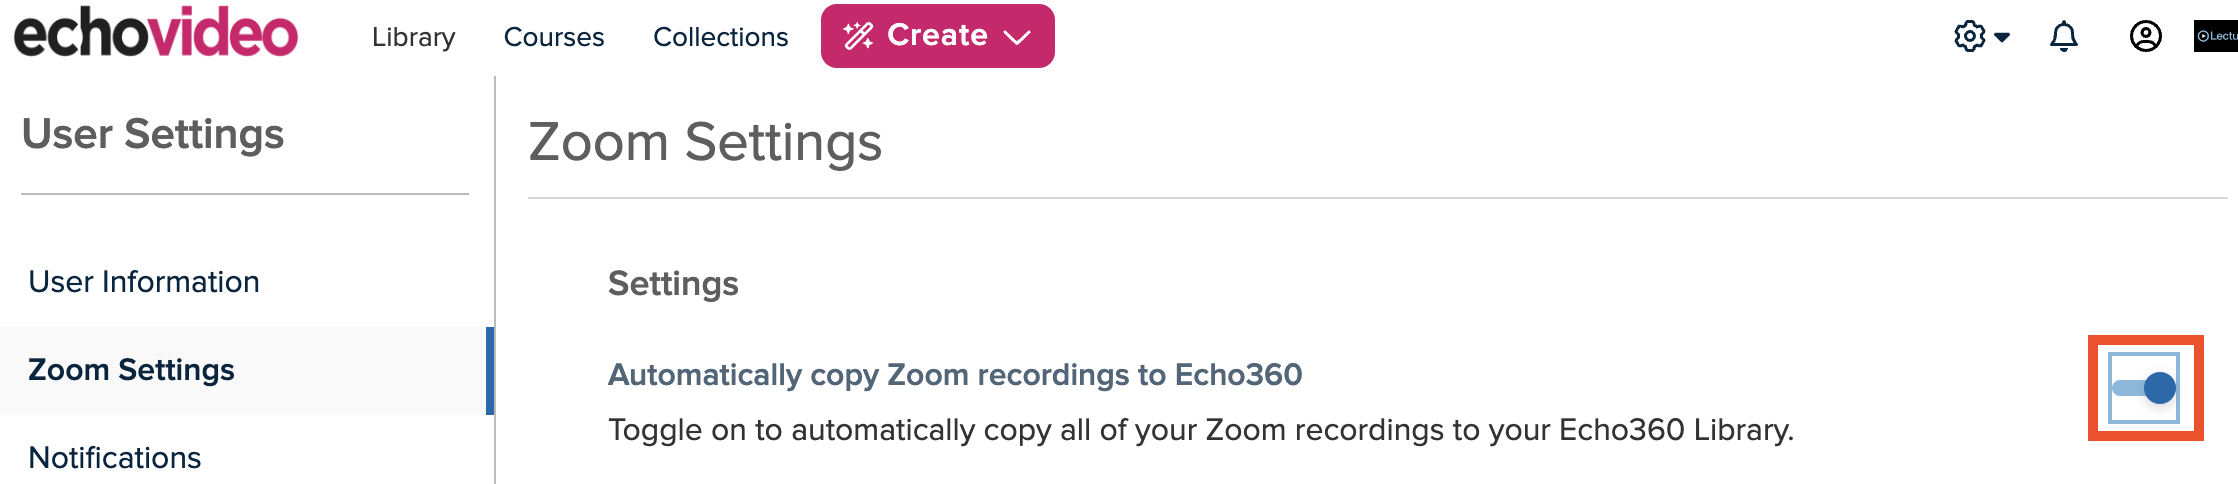
Step 4: Make sure that the ‘Automatically copy Zoom recordings to Echo360’ option is toggled to the ON position, as per screenshot below:
Note:
This is recommended only if the majority of your Zoom recordings are teaching-related, such as lectures or tutorials, as it allows for future reference and easy sharing with your students.
Making Zoom Recordings Available in Moodle
Zoom recordings are automatically saved in the Lecturecast library of the host, which is the person who organised the Zoom meeting. If using the Zoom plugin in Moodle, a recording will be saved in the personal Lecturecast library of the course administrator or tutor who created the Zoom activity. Please see the Zoom recordings in Lecturecast guidance on how to make recordings available to students.
Additionally, there are two other ways to share a Zoom recording with your students:
- Copy and paste the link to your Zoom recording into your Moodle course page.
- NOTE: Recordings in Zoom cloud will be available on a short-term basis, so this method is only suitable if you need temporary access only.
- Download your Zoom recording as an MP4 video file to your computer and upload it to Lecturecast; this will ensure your recording will remain available for students in the long term.
Caution
Co-hosts
During a Zoom meeting, the Host can make other tutors or staff Co-hosts in order to help manage the session. This is especially useful for large sessions. See Zoom's guidance on how to enable and use the Co-host option. For guidance on the Co-host role and others, see Zoom's guidance on Roles.
Alternative Hosts
The Zoom Meetings plugin only assigns the user who created the activity as the host within Zoom. The Alternative Host role does not have the complete Host permissions, see Zoom's guidance on Roles. If you are scheduling on behalf of someone, it is preferable to request scheduling privileges as explained under Scheduling on behalf of another user.
Deleting Zoom Meetings
When you delete a Zoom meeting activity from your Moodle course, it's sent to the recycle bin of your course and it stays there for 12 weeks. You will receive an e-mail notification shortly after doing this confirming your scheduled meeting has been deleted from Zoom itself. If the meeting was deleted intentionally as it's no longer needed, you don't need to do anything extra. However, if the meeting was deleted by mistake, you have 12 weeks to restore the activity from the recycle bin and the meeting will once again be scheduled in Zoom.
Duplicating Zoom Meetings
We don't recommend using Moodle's duplicate function on Zoom meeting activities. If you wish to setup multiple meetings with the same settings, please manually create a Zoom meeting activity each time.
Editing Zoom Meetings
Any user with the ability to edit a Moodle course is able to edit the Zoom meeting activities that they're not a host for. Due to this, please take care when editing Moodle courses that may have Zoom meetings with different hosts, as any edits are saved in Zoom.
Editing a Zoom meeting name on Moodle will appear to change the name of the Zoom meeting on Zoom. However, the edit is only temporary. Digital Education is currently investigating this issue.
Recurring Meetings
During the setup of a Zoom meeting, you can create a recurring meeting, which is a single, never ending meeting. We don't recommend using this option and recommend creating individual meeting activities within your Moodle course. While this does create more work, these individual activities appear in the Moodle calendar and timeline of your students alongside Moodle or TurnitIn assignments.
E-Mail Notifications
The waiting room for a Zoom meeting will open 15 minutes before the session is due to begin. During this time, students are able to join the meeting ahead of time. As a host, you will receive one email notification per student that joins the waiting room before you join the scheduled meeting.
Breakout Rooms
The Zoom Meetings plugin currently doesn't support the creation of breakout rooms within Moodle. You're still able to create and use breakout rooms within Zoom itself once the meeting has started.
Examples and Case Studies
Coming soon
Known Issues:
Go to the Known Issues - Moodle Wiki page
Questions & Answers
Further Information
For more information on using Zoom, please see the Zoom Resource Centre.
This information is provided by Digital Education
( https://www.ucl.ac.uk/isd/digital-education-team-information ) and licensed under a Creative Commons Attribution-ShareAlike 4.0 International License
