M09a3 - Moodle Assignment Rubric
Keywords: assessment, feedback, grading, marking, plagiarism, referencing, reference.
What is it?
Rubrics let you tabulate criteria, (or what counts in the work), against performance levels, which you can then select depending on how well each student meets each criterion. Moodle rubrics require you to define points for each level. Once marked, the rubric will automatically calculate a grade (i.e. a quantitative rubric). You can also leave a comment on each criterion. The grade can be overridden if required in the Gradebook.
Rubrics contrast with Marking Guides, (which are similar to Grading Forms in Turnitin) - the latter allows you to specify a criteria but instead of levels there is only a numeric grade option.
Why use it?
Rubrics serve three broad functions, they provide:
- A standard by which to grade students' work that is available to students before and after they submit.
- A vehicle for giving feedback.
- Evidence for the teaching team.
Rubrics can make marking faster and feedback straightforward to read. They can also help students understand the marking criteria before they write and submit their work. They also highlight the strengths and weaknesses of a student's submission and the impact they had on their grade. Ideally, rubrics can also give feedback that feeds forward into future assignments.
Who can use it?
Users with editing permissions, typically staff, can create and edit rubrics and attach them to assignments.
Before I start...
Decide whether you want to use rubrics to calculate grades, or just for feedback.
Calculate grades
This type of rubric shows what proportion of the total marks were ascribed to each criteria, (namely, Criteria 1 = 50%, 2 = 30% and 3 = 20%) and what proportion of those marks were awarded the student based on his/her performance. In this case, the rubrics would calculate a score of 70% the maximum possible grade being 100%.
| Criteria 1 | Fail – blah... points 0 | Weak – blah... points 5 | Average – blah... points 10 | Good – blah... points 15 |
| Criteria 2 | Fail – blah... points 0 | Weak – blah... points 3 | Average – blah... points 6 | Good – blah... points 9 |
| Criteria 3 | Fail – blah... points 0 | Weak – blah... points 2 | Average – blah... points 4 | Good – blah... points 6 |
Feedback only
The green cells indicate how the marker assessed the student's performance against each of the criteria set.
| Criteria 1 | Weak – blah... | Average – blah... | Good – blah... |
| Criteria 2 | Weak – blah... | Average – blah... | Good – blah... |
| Criteria 3 | Weak – blah... | Average – blah... | Good – blah... |
How do I set one up?
- Create or open an existing Moodle Assignment.
- Click 'Settings' to open the Moodle Assignment Settings page.
- In the Grade section, alongside Grading method, choose Rubric.
- Click 'Save and display' to save the settings and enter the Moodle Assignment.
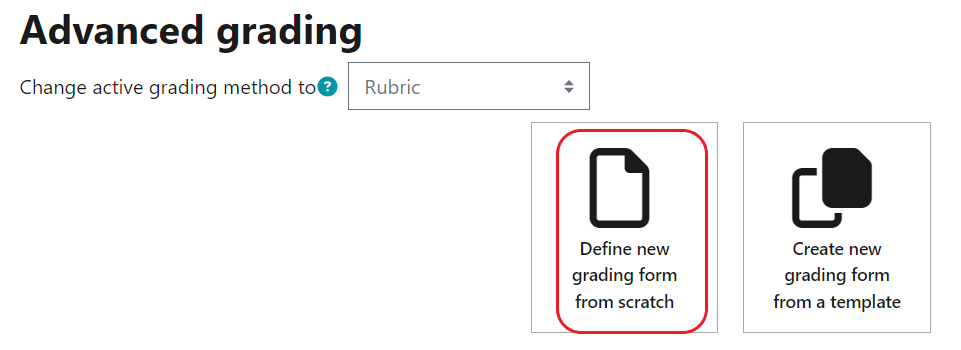
- Under Advanced Grading, Click 'Define new grading form from scratch', unless you want to use an existing template.
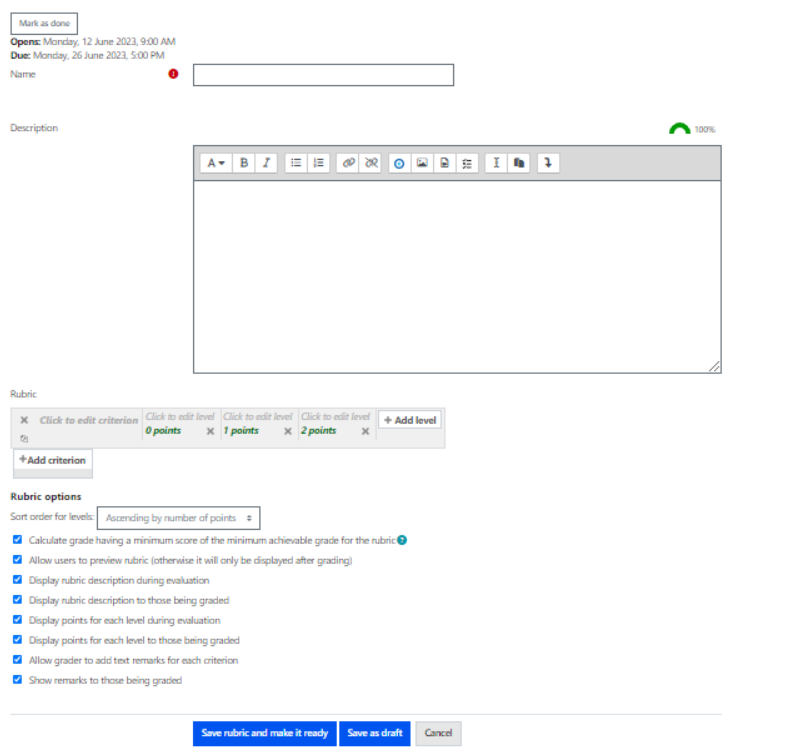
- Give the rubric a name and click 'Add Criterion' to write the first criterion.
- Click in each section and add a description to each level for the criterion. Start with the inadequate level (scoring 0) and add more proficient levels until you reach the highest level in your rubric.
- To edit the scores for each level click on each and enter a number.
- To add new levels click the +'Add level' button.
- To add further criterion click the '+Add criterion' button and repeat the above process to edit the criterion name and level descriptions.
- Once you have filled in the rubric click 'Save rubric and make it ready'.
- The next page allows you to Publish the form as a new template and should now say READY FOR USAGE.
- Click the 'Settings' menu at the top of the assignment page.
- Scroll down to the Grade heading and ensure the maximum grade is still set to 100. (It may have changed to match the maximum score in the rubric, which may not be 100).
- Click 'Save and display'.
- Click View all submissions (or click Grade and go to step 20. Selecting Grade will show one submission at a time).
- Click the Grade column alongside the first person you want to grade.
- Click on each area of the grading form to enter your mark. You can add additional comments in the last column (if enabled).
- The grade will be calculated when you click 'Save changes'. (Selecting Save and show next will save the grade and feedback, and display the next student's work for marking.
Further help
- Further guidance on Rubrics is available from Moodle Docs.
- For examples of rubrics check out: http://rubistar.4teachers.org
If you find any inaccurate or missing information you can even update this yourself (it's a communal wiki).
If you have a specific question about the tool please contact the Digital Education team.
Caution
Although rubrics can help with consistent marking, they can also give the impression that marking is highly standardised when in fact it ultimately relies on judgements. Community measures to build shared understandings of criteria help students to come to terms with nuance in marking.
Students can find it very challenging to relate their rubric feedback to their numeric mark. One approach is to allow the rubric to calculate the mark by associating points with each level. Students can then understand the relative weighting of each criteria, and where they lost and gained marks. Some UCL students have reported that they appreciate this clarity, and some tutors have said it helps them to focus their responses to student queries.
Students appreciate assessors using the comments field to explain the level the student reached on each criterion of the rubric.
Where criteria are given it is helpful to reference them in any inline comments, as far as possible, to help students relate the comments to the criteria. This is particularly important in feedback-only rubrics, where it also serves to reassure students that the assessors are actually using the criteria to reach their judgement.
Examples and case studies
None at this time.
Questions & Answers
None at this time.
Further information
See also:
This information is provided by Digital Education
( https://www.ucl.ac.uk/isd/digital-education-team-information ) and licensed under a Creative Commons Attribution-ShareAlike 4.0 International License
