M09a1 - Marking and Giving Feedback in Moodle Assignment
Keywords: assessment, feedback, grading, marking, plagiarism, referencing, reference.
Please refer to guide M09 - Digital Assessment - an Overview for the different phases of digital assessment at UCL.
On this page:
What is it?
As well as letting you collect work submitted by students, Moodle Assignment allows you to mark work, both online and offline. It offers a range of ways to give feedback and a place to record a numeric grade.
Assignment grading quick guide on Moodle Docs
Why use it?
- Digital feedback is more reliably comprehensible than handwritten feedback.
- It is available to students when they need to refer to it in their subsequent work.
- Different feedback modes can be combined to improve student engagement including specific annotations, structured marksheets, general comments, video and audio feedback, and feedback files (which allow for annotations on student work, screencasts, spoken feedback etc).
- The feedback can be accessed via MyFeedback, which encourages students to cross-reference and take an integrated view of progress.
- MyFeedback also allows students, personal tutors and other selected staff to follow progress over time.
- Moodle Assignment can handle independent ('blind') marking because it allows inboxes of submissions to be downloaded (preserving anonymity if needed) along with a marksheet.
- Similarly Moodle Assignment can handle offline marking by allowing submissions and marksheet to be downloaded, preserving anonymity if needed.
Who can use it?
Single or multiple markers.
Before I start...
Usually assessors need to hide marks and feedback from students until a provisional date. To do this, refer to guidance on hiding grades is available from Moodle Docs.
Choosing feedback types
When you are setting up your assignment, you decide on the type of feedback you will give. In the Assignment settings go to the Feedback types section, which allows you a combination of feedback types. Further feedback modes are determined in the Grade > Grading method setting (through the use of Simple direct grading, Marking Guide or Rubric)
The different feedback types are explained on Moodle Docs .
How do I mark?
Step 1: Access the Assignment submissions
After the final submission date, go to the Assignment (e.g. via the Assignments link in the Activities box in the right-hand side of your course page).
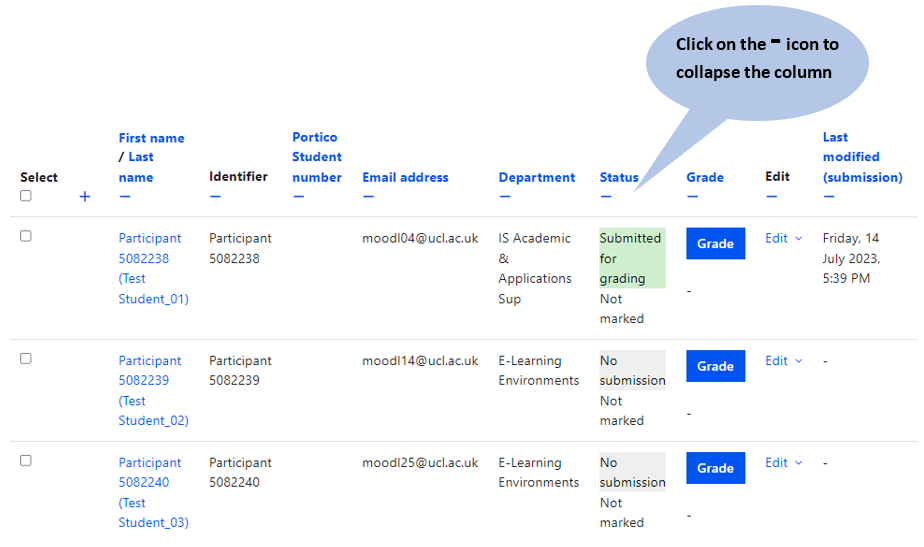
Click on View all submissions.
From this page, you can grade, download and upload submissions, and release grades.
The columns within the inbox can be collapsed. This will allow you to only see the ‘useful’ columns when viewing submissions.
Step 2: Prepare submissions for marking - ensure marking is hidden from students
You should see a paper 'status' on the View all submissions page. If Marking Workflow is turned on, so long as the status is not set to Released, feedback and grades will be hidden from students.
If you didn’t set an end date on Moodle when creating the assignment, you can choose Lock submissions at the bottom of the page to prevent new uploads.
Step 3: Mark submissions
Option A: To mark offline
- If you want to do offline marking, on the 'View all submissions' page, choose the relevant action from the Grading action dropdown menu, at the top left of the submissions window, such as 'Download all submissions' and 'Download grading worksheet'.
- The submissions will be downloaded as a zip file that you can extract to your computer.
- Each student will have their own folder (usually anonymised by number) containing their submitted file(s). You can then annotate their submission, or add further files (for example marking sheets, audio or video feedback files) into the same student folder.
- The grading worksheet will contain a row for each student (identified by submission number matching the submission folder number, if anonymous) and you can use this sheet to enter the grade and any general feedback.
Once you have finished marking, re-upload marking by:
- Zip the files back together (Note. zip the student folders together, don't zip the assignment folder which contains the submissions. You can re-name your zipped folder if necessary it should not impact upload).
- Return to the submission inbox, and select "Upload multiple feedback files in a zip" and follow the prompts to upload the zipped folder to Moodle. Additional files will be attached as feedback to each student's submission.
Option B: To mark online
- Click on Grade in the Assignment to grade each student one-by-one.
- Fill in the feedback box (you can add video and audio feedback using the text editor) add some annotations, and enter the Grade in the space provided.
- If you have enabled Marking Workflow, set the status of the paper to 'Marking completed' to keep a running record of marking.
- Click Save Changes. (Don't tick “notify students” as you should send this all at the same time).
Step 4: Return marks to students
Step 4a: Release feedback
When marking is complete, g o back to the Assignment and click View all submissions.
If you have enabled Marking Workflow:
- You can select all or a subset of submissions using the checkbox. Note. clicking the checkbox at the top of the table, selects all the submissions.
- From the With selected... drop-down menu choose Set Marking Workflow state and click Go.
- In the subsequent page, change the Marking Workflow state to 'Released' and click 'Save changes'. This will release grades and feedback to students without revealing student identities to markers.
If you have NOT enabled Marking Workflow:
- From the 'Grading action' drop-down menu, choose Reveal identities. It is only now that the grades will be added to the Gradebook (see below).
Optional steps:
Make an announcement to inform students
Export Grades from the Gradebook
You can now export the grades, for instance by clicking on the “View gradebook” in the Settings, selecting Export from the top row of tabs, then choosing the desired file format from the 2nd row of tabs, ticking only the assignment(s) that you want exported, and then Download.
Check the grade has been released in the Gradebook
- On your Moodle course main page, click the Grades menu.
- Click the User report tab.
- Select a random student from the Search Users drop-down.
You should now be able to see the grade as it appears to the student(s).
Check in the Gradebook that the assignment and grades are set to visible:
If you have followed the steps provided, grades and feedback should be released to students.
If an assignment is hidden in the Gradebook, this will in turn, hide the assignment grade and feedback.
- On your Moodle course, click the Grades menu.
- Click the Gradebook Setup tab.
- The assignment is hidden from students if it displays with a crossed out eye symbol to the right of it. You can un-hide an assignment by clicking ellipses under the Actions column, then selecting Show.
Email students that their feedback and grades are available
Send a message to students that the grades and feedback should now be available on Moodle in their "My Feedback" section. (This will be received in Moodle messages, and students will NOT receive an email notification).
Instruct students to download any annotated PDFs, rather than simply accessing via the 'preview' screen. The preview sometimes displays comments in a way that obscures the original text.
- Within the Moodle assignment (or via the Participants menu on the main course page - to send to all students on the course).
- Select individual or all students (You can click the Select tick box at the top left of the page).
- Go to bottom of the page, at the "With Selected" drop down menu click Send a message.
(These instructions have been adapted from instructions provided by Kris Thielemans from the Faculty of Medical Sciences.)
Further help
Further guidance on using Assignment is available from Moodle Docs.
If you find any inaccurate or missing information feel free to update this yourself (it's a communal wiki).
If you have a specific question please contact the Digital Education team.
Organising markers
- One way to allocate markers to work is to put students and markers into Groups.
- However, if you want to allocate markers on the fly e.g. based on area of expertise, or if dates for each marking stage are a bit more fluid, you can use Marking Workflow - see this Workflow video for an overview; guidance on Workflow is available from Moodle Docs.
- Multiple markers who don't need to be independent ('blind') can both mark online - but they need to decide in advance how to enter feedback and marks. Where there is blind marking an approach is for one assessor to mark on Moodle and the other to mark downloaded submissions and use the offline grading worksheet to make notes or give feedback.
Caution
- Do take active steps to hide marks and feedback from students - otherwise they show one by one as you mark. Refer to the Moodle Docs guidance on hiding grades.
- Give focused, concise feedback. Although Moodle Assignment offers several different modes of feedback, feedback is demanding of students. They need to relate the different bits of feedback to each other, to the criteria, to their mark, sometimes to a model answer, and to the decisions they made with their work, sometimes weeks previously.
- Uploading an offline grading worksheet will overwrite any existing marks and summary feedback.
- The maximum length for video and Audio feedback is 2 minutes. However, you can add multiple video and audio recordings.
Examples and case studies
Elodie Douarin (UCL SSEES) used Moodle Assignment, including rubrics, to help her students relate feedback to assessment criteria. Read her project report.
Questions & Answers
See:
Further information
-
This information is provided by Digital Education
( https://www.ucl.ac.uk/isd/digital-education-team-information ) and licensed under a Creative Commons Attribution-ShareAlike 4.0 International License
