Anthropology MyPortfolio induction
.png?version=1&modificationDate=1413464597000&cacheVersion=1&api=v2)
This induction to MyPortfolio is for Anthropology students and their tutors. It contains instructions to work through step by step and we think it will take around 60-90 minutes to complete.
To reveal step-by-step instructions for each task, click the Tell me how links next to the blue arrow heads.
Here you will find:
What's in this worksheet
In this MyPortfolio induction worksheet for staff and students you'll find out how to:
- Upload materials to MyPortfolio.
- Make a Page in your own Portfolio.
- Add the Page to a Collection.
- Display the Collection as a Navigation menu.
- How to make an assessor-friendly space.
- How to submit your work
Below, under most tasks, you will see 'Tell me how' next to a blue arrow head. Click there to reveal step-by-step instructions for the task - if you want or need them.
| Top of page |
Three main things to know about MyPortfolio

You have a personal Portfolio context and a Group context - here you are working in your Portfolio context.
Within either or both there are three stages to keep in mind:
- Create and upload Content or embed material hosted elsewhere on the web
- Arrange and present your Content within Pages - otherwise nobody can see it.
- Share Pages e.g. to your assessor – otherwise they remain private to you.
Photo credit: mag3737 via photopin - cc licensed.
Under most task headings below you will see a 'Tell me how' label next to a blue arrow head. Click there to reveal step-by-step instructions for the task - if you want or need them.
| Top of page |
Why MyPortfolio?
 Tell me why.
| Top of page |
Some examples of MyPortfolio work
Below are some examples of work, shown with kind permission of the students who made them. Some of the examples are the products of group work, and others of individual work. We show them to give you a sense of the range of possibilities.
From UCL Anthropology, follow the links within this post about students work for the Digital Anthropology module convened at that time by Dr Heidi Geismar.
From Object Lessons (a BA Arts and Sciences module):
- Liar, liar, Pants on Fire - Challenges and Mistakes in Museums.
- Dumped - Lost and Found in the UCL Collections.
- Technology - From Mongrels to Minitels.
- Conflicted Objects - Arguing the Way Through History.
- Between life and death.
- Wikipedia in academia.
See too the annotated screenshot (PDF format) below which shows how the different elements of the 'Making History Hooray 4A3 History' group's front page were made.
Thanks to the students who gave their permission.
| Top of page |
How to access MyPortfolio
Keep this web page open and open a new tab in your web browser (keystrokes for this are Ctrl + t, or Apple key + t). In the new tab, go to https://myportfolio.ucl.ac.uk and log in with your UCL UserID. Depending on which browser you're using, you may be able to keystroke between the tabs by using Ctrl + Tab (right) and Ctrl + Shift + Tab (left).
Note that later on you can reach MyPortfolio via a side block in the Moodle course area.
About Content – your personal filespace
From your own Portfolio context, click the Content tab, then from its submenu click Files.
Files are one form of content you can use in MyPortfolio – other forms are included as embeds, which we'll look at later on.
Remember, uploading content is the first stage - anything here is private to you unless you put it in a Page and share that Page.
Upload your files of material
The content you display MyPortfolio is either embedded from elsewhere on the internet or it's uploaded. Let's first look at uploading. Have an image and a document somewhere you can browse to them eg a USB drive or your N Drive.
You probably have material with you, but if not then download some of these to your computer's filespace or to a USB drive: https://www.dropbox.com/sh/etxlxwkxsy65aw2/qV66fgFR0H.
Now upload the file(s) to MyPortfolio.
Tell me how.
| Top of page |
Make a Folder
Why make a folder? It can help you organise and find your files again. A folder can also be shared on a Page.
Tell me how.
| Top of page |
Move your File into your Folder
Tell me how.
| Top of page |
Move your File back outside your Folder
Tell me how.
| Top of page |
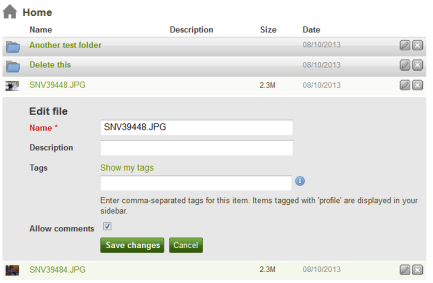
Editing files
Note that, when in your Files area, you can edit each File's name, description and other attributes by clicking on Edit (sometimes displays as a Pen icon, sometimes as a button).
Remember to Save any changes.
| Top of page |
Summary and next steps
We've covered uploading files, creating folders and moving files between folders.
Next, still within your own Portfolio context, let's now move on to displaying this content within Pages.
About Portfolio - working with Pages you'll show
Make a Page and add your image
Tell me how.
| Top of page |
Edit your Page's layout
Give your Page a different number or configuration of rows and columns than it started of with.
Tell me how.
| Top of page |
Embedding externally-hosted media into your Page
You may be using external web services to work with images, video, sound, infographics, timelines, visualisations - and more. Rather than forcing you to export, many hosts encourage you to share and embed. 'Embedding' means that the materials remain hosted in the original location, but can display in many other locations (and simultaneously if needed). Examples are YouTube, SoundCloud, and Flickr - all widely used at UCL.
What media can I embed?
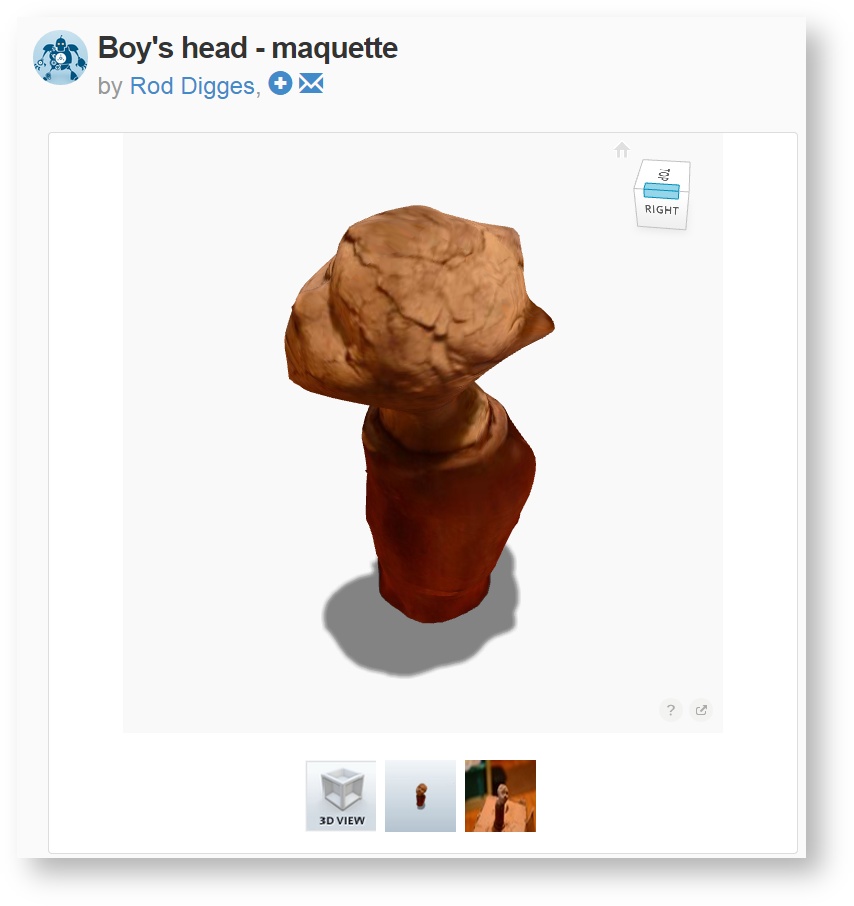 Rod Digges from ELE has examples of how different media can be shown in MyPortfolio. He weighs up the benefits and drawbacks of each alternative.
In particular note the 3D model example. He made this with a mobile app called Autodesk 123D which turns your camera phone into a 3D scanner. For more examples of 3D scans of UCL objects see 3D Petrie.
Embed some external media
Working with YouTube for the sake of this exercise, embed some media hosted externally.
Tell me how.
| Top of page |
Troubleshooting embedded media
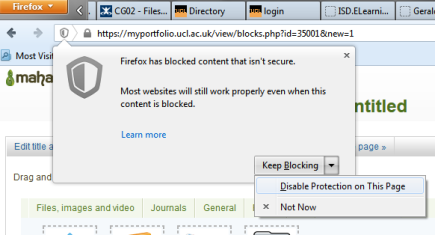
Video not displaying? Sometimes your web browser gets a bit paranoid. Look carefully - is there an alert asking you to enabled blocked content? One example is later versions of the Firefox browser. To display blocked content, on your browser's address bar click the little shield icon (or equivalent) and tell the browser you want to disable protection for the webpage.
Video still not displaying? You could try the External media block as an alternative which does similar things to Embed.ly and sometimes succeeds where it fails.
Still no joy? Some media hosts don't enable sharing in this way (it's usually easy to tell because there are no conspicuous links to Embed or Share) – in that case you can link to the page rather than embedding it. One way to do this is to use a Textbox block, which we'll look at next.
Putting a Text box block on your Page
Now you've added an image and embedded a video, next add a Texbox - this is the best way to add passages of text to a Page.
Tell me how.
| Top of page |
Making stuff for your Pages
You can find video, image hosting, timeline, infographic, mapping and calendar software pretty easily. Do check the terms and conditions, and keep in mind that you might need a contingency if the service isn't running when you need it.
Other than that you may like to refer to this lovely list of free, free-to-students, or free-to-try software curated by Alan Liu.
Summary and next steps
You now have an image, a video and some text on a Page for which you have allowed copying. Basically, anything you want to share with or display to others needs first to be on a Page.
Hopefully you can now infer how to include other kinds of files in Blocks within Pages. You can easily remove Blocks and delete anything you want to, so do experiment.
Now let's move on to considering how to make an assessor-friendly space
| Top of page |
Sharing - letting others (e.g. assessors) see your work
The most straightforward way is to publish the Collection containing your Pages and if (as is probable) you have some Pages which exist outside Collections, publish those individually.
Give your assessor(s) the link to the landing page for your work, and ensure that all other pages are clearly linked from that.
The following instructions publish work on the web for selected viewers (different from allowing copying - for that use the CreativeCommons block in addition to publish).
To share a Collection, or an individual Page outside a Collection
To obtain a secret URL which allows you to share a Page or Collection with anybody:
- Hover your mouse pointer over the Portfolio menu to expand it and then click the Shared by me link; a list of your Collections displays - note the other tab which lists Pages outside collections.
- Next, to obtain the web address of your shared Page or Collection, click its adjacent globe Secret URLs icon; the Secret URLs page displays.
- Copy the URL - this will be what you share with anybody you want to see the work.
- Return to the landing page of your work. Create a new Textbox and paste the URL into it. This means that when you export your work (explained below) your assessor will be able to reach the live version.
To share with an individual or group or with the general public:
- Hover your mouse pointer over the Portfolio menu to expand it and then click the Shared by me link; a list of your Collections displays - note the other tab which lists Pages outside collections.
- To edit access to the item you need to share, click its adjacent padlock Edit Access icon; its Edit access page displays.
Under Shared With, add the people or groups you need to share with.
- Then Save; you're returned to the earlier page.
| Top of page |
To export into html format and upload to Moodle
If you are specifically expected to do this for assessment:
- Go into your Portfolio, click the Export tab; a list of options will be displayed.
- Under Choose and export format, select Standalone HTML website.
- Under What do you want to export? select either Just some of my pages or Just some of my collections; if you try to select from both only the collections will be accessible via the exported file.
- Untick Include user feedback; this shouldn't be necessary for your assessment.
- Click Generate export; this will automatically start the download of your file.
Once the download is complete you can unzip the file or upload the zip file to your Moodle assignment. The Index page within the zip file is how you can access the pages or collections you've exported.
| Top of page |
Comments and feedback
How to allow comments or feedback on work
- Hover your mouse pointer over the Portfolio menu to expand it and then click the Shared by me link; a list of your Collections displays - note the other tab which lists Pages outside collections.
- To configure comments for a Page or Collection, click its adjacent padlock Edit Access icon; its Edit access page displays.
- Click the Advanced options link; expanded options display.
- Configure the Comments as you wish.
- Scroll down and Save.
- Note that commenters can decide whether their comment is public or private (just for the owner); however, the owner can override this setting.
| Top of page |
How to give comments or feedback
The Add Comment space is usually towards the bottom of each Page. You can use this to give feedback on work without actually editing it. Here's how it works.
Unless the Page's creator has set the Page not to accept Comments (see its Sharing settings) then anybody who can see the Page can comment. To do this, click the Add Comment link, type or attach comments, and then click the Place feedback button to post it under the Page.
What can you include in feedback? You can type text, insert links and also attach a file.
Who can see the feedback? The principle is that Page owners also own the Feedback on their Page. Correspondingly the Feedback owners ultimately relinquish control over whether the comment is public or not (though they can always delete the comment). So, whether the Feedback is public depends to some extent on whether the person leaving Feedback you have decided not to check the Make public box - but be aware that the Page owner can override this by choosing to make it public or to delete it.
If I uncheck the Public box, who can see Feedback I leave? Only you and the Page's owner. So, if the Page is owned by an individual, just that individual (this includes Pages in the Pages shared to this group by others category). If it's a Group page, then any Group member can see the Feedback.
How can I tell if Comments moderated? There's a statement under the Make Public settings.
| Top of page |
How to make an assessor-friendly space
Your assessors will have finite time to look at your work, so you need to make things as straightforward as possible for them. Here we make some suggestions about how to do that - but do remember to check your handbook to find out how you will get credit for your work here.
Include these elements in your submission's landing page
This is the page which assessors land on when they click on the link you supply. As such it's a first impression and a signpost to the rest of the space. A welcoming landing page might have the following elements (do check your handbook though, for any other elements you need to include):
- Brief introduction or overview – this could be a Textbox block.
- Some imagery might be appropriate – this could be an Image block, or embedded media using one of the External Content blocks.
- Crystal clear navigation which provides both a top level overview of your space and also a clear path to reach each part – this would entail making a Collection of Pages and putting them into a Navigation block.
- No distractions e.g. superfluous blocks.
| Top of page |
Do use Collections and Navigation
Why create a Collection?
Once you have more than a few pages, your assessors will need some signposts. Collections are groups of Pages which can be displayed as a menu on your Homepage (or any other Page) via a Navigation block. These are the best way to:
- signpost and orientate your assessors and other viewers;
- indicate a sequence and relationship between different Pages.
First you create the Collection, then the menus (as Navigation Blocks). The benefits here are if you eg change the title of a Page, the menu automatically updates, and if you add or remove Pages in the Collection, the menu automatically updates then too. So, if you think this would be helpful then do try to use Navigation blocks on your submission's landing page.
Note that at the moment Pages can only exist in one Collection at once - so if you want to include a Page in more than one Collection, then create a copy of the Page - and best leave making the copy until you're certain that the original is finished – otherwise you'll have to carry out any edits on the copies as well as the original.
| Top of page |
How to organise Pages into a Collection
To do this exercise, make sure you have a few Pages in your Portfolio (create some empty ones if necessary).
Tell me how.
Pages can only appear in one Collection at once. If you want a Page to appear in more than one, then copy the finalised Page and include separate copies in each Collection. N.b. if one of the copies changes, you do need to remember to duplicate the changes across the other copies (sadly this can't be automated and needs to be done individually).
Remember, everything you want to display needs to be added to a Page - including your new Collection. We'll do that next.
| Top of page |
Add a Collection to a Page with a Navigation Block
Next make the links to the Pages in a Collection appear as a menu by adding a Navigation block to a Page.
Tell me how.
Make one page the landing page or home page for your project. This will be the first encounter assessors and other viewers will have with your space, so it makes sense to put Navigation blocks there to signpost them. Include this page in the Collection and call it something like 'Home'.
| Top of page |
Summary and next steps
In this section we have considered the importance of your project landing Page, and looked into setting up a Collection to display it on that Homepage as a Navigation block. This gives your readers (including assessors) an immediate impression of the contents of the space and a way to get to each part of it.
Next we will consider sharing and publishing.
| Top of page |
Allowing others to copy and adapt your work (CreativeCommons licensing)
Once you have shared your Pages and technically enabled copying, you can use a MyPortfolio CreativeCommons block to selectively give permission for copying - if you want to.
What is CreativeCommons? See the following video by UCL student Michael Ruddlesden:
Video below not showing? It's probably a security setting on your browser - to reveal the video see instructions above for troubleshooting embedded media.
If you're allowing copying, then don't forget to also technically enable copying on your Page and any constituent parts from elsewhere - see aforementioned instructions.
| Top of Page |
What have we left out from this guidance?
If you're using this guidance as part of a workshop, then I need to mention that because of time pressures we've skipped over some good stuff including:
- What happens to your MyPortfolio work after you graduate? You can export the contents of your own portfolio either as a website or as a packaged up portfolio to be imported into another portfolio environment.
- Your Profile – this is an important part of your online presence, especially if you're not yet acquainted with others in your Group. You get to this by clicking on the Content tab; your editable Profile then displays. To include a picture, click on the adjacent Profile pictures tab.
- To easily upload media from your own phone or tablet, there is the PortfolioUp! app for Apple devices and the MaharaDroid app for Android.
- Note your File storage allocation of 500Mb – use this carefully. In other guidance we explain how to avoid running out of space, and how to Export material from MyPortfolio.
- The limit for each individual upload is 160Mb.
See below for links to more guidance.
| Top of page |
Help!
Don't worry about asking questions – if you are struggling with an aspect of MyPortfolio, chances are that somebody else is too. Moreover, asking the questions gives E-Learning Environments a better understanding of how to support staff and students using MyPortfolio.
There are several alternatives – we'd recommend starting by asking people involved in your module (a group member or TA) and by using the community support forum.
- UCL Engineering's Matt Lever has made some video guides to MyPortfolio basics -https://www.youtube.com/playlist?list=PLWSHabhKjK-rz_rNanVKM3C_bW-uirIQM
- Guides at the UCL MyPortfolio Resource Centre - https://wiki.ucl.ac.uk/display/Mahara/MyPortfolio+Resource+Centre+-+home
- We'd recommend students contact their tutor and fellow group members in the first instance.
- Contact ELE - the support team can be reached via email ele@ucl.ac.uk, and via phone on 020 3549 5678020 3549 5678 (internal: 65678). In addition (i.e. not instead) you can contact your Faculty's E-Learning Facilitator (for SLASH that's Mira Vogel on 020 3549 5197020 3549 5197, internal: 65197).
- Mahara (the software we call MyPortfolio) has its own guides – we're on version 1.8 http://manual.mahara.org/en/1.8/
- Search YouTube - somebody may have recorded a screencast of what you are looking for.
| Top of page |
Examples of MyPortfolio pages
As well as those linked from the UCL MyPortfolio Resource Centre linked above, see below an annotated screenshot (PDF format) identifying the different elements of a Page.
- an annotated screenshot.
- Wikipedia in academia - a MyPortfolio group space open to logged in MyPortfolio users. Find it on MyPortfolio via Groups > Find groups > search term:Wikipedia
| Top of page |
Creative Commons licence details

This Mahara Induction by UCL ELE is licensed under a Creative Commons Attribution-NonCommercial 4.0 International License.